The purpose of this article is to describe how to use FluentBooks Download(Import) SharePoint Sites and Upload(Export) SharePoint Sites wizards in order to migrate SharePoint Sites and their content from source to target PWA:
- migrate Lists & Libraries;
- migrate Content Types;
- migrate Site Columns;
- activate Site Features;
- migrate List Workflows and associate them with Lists;
- migrate Excel Reports and process them;
- migrate ODC files and process them;
- migrate Solutions (templates);
- migrate a SharePoint Site with a custom template;
- migrate a SharePoint Site without a custom template and apply a custom template during export.
NOTE about Site Features:
Site Feature should be present on the target PWA so that FluentBooks could activate it. Otherwise, it will be recorded in the log file that Site Feature is not present, so there is nothing to be activated. Also if the Site Feature exists on the target PWA, but cannot be activated manually by clicking ‘Activate’, e.g. some error occurs, then FluentBooks will not be able to activate this feature as well.
NOTE about Project Sites:
If SharePoint Site on the source PWA was a Project Site, i.e. associated with a Project, then during export of this Site to the target PWA FluentBooks will attempt to find the appropriate Project (by GUID or Title) to associate the Site with. If the Project was found, then FluentBooks will associate the Site with this Project, otherwise, a record will be added to the log that the Project was not found.
NOTE about Excel Reports:
In order to process the Excel Reports during migration MS Excel 2013 is required. If MS Excel is not installed on the machine where FluentBooks is running or the version is different, then Excel Reports will not be processed and this will be recorded in the log file.
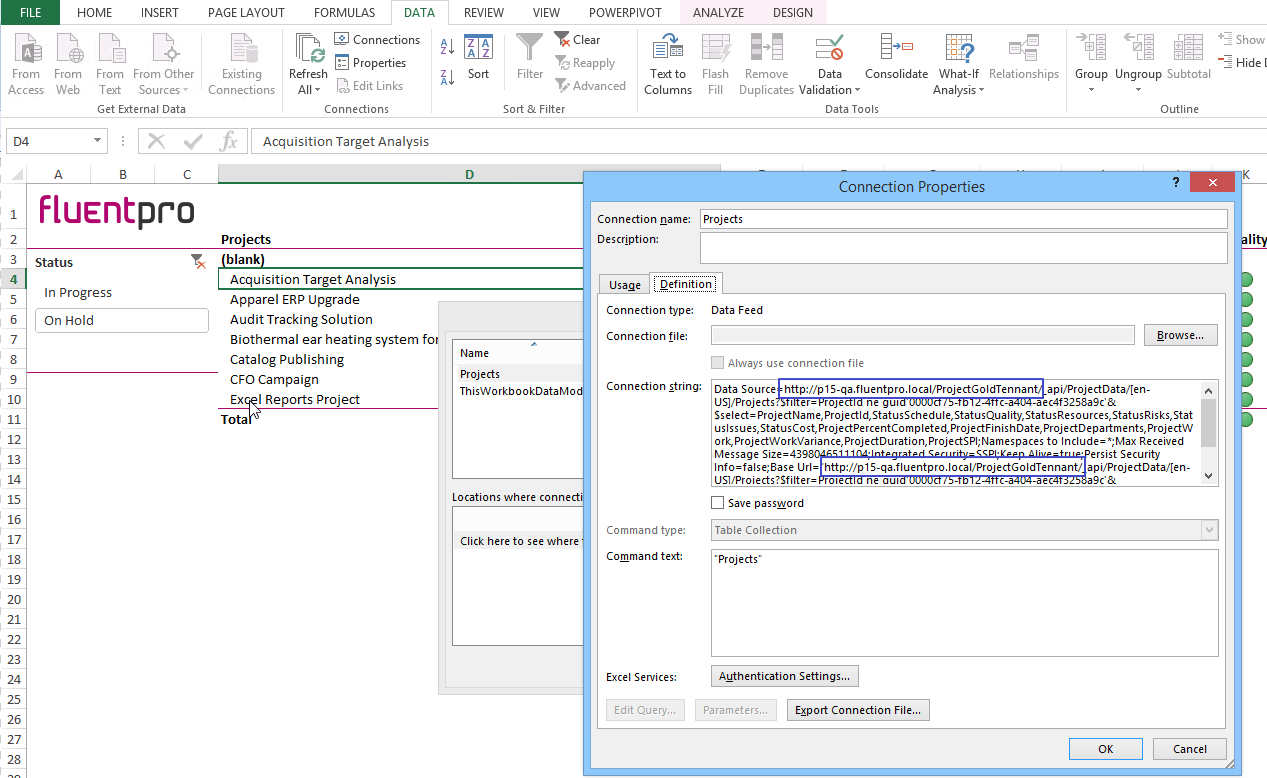
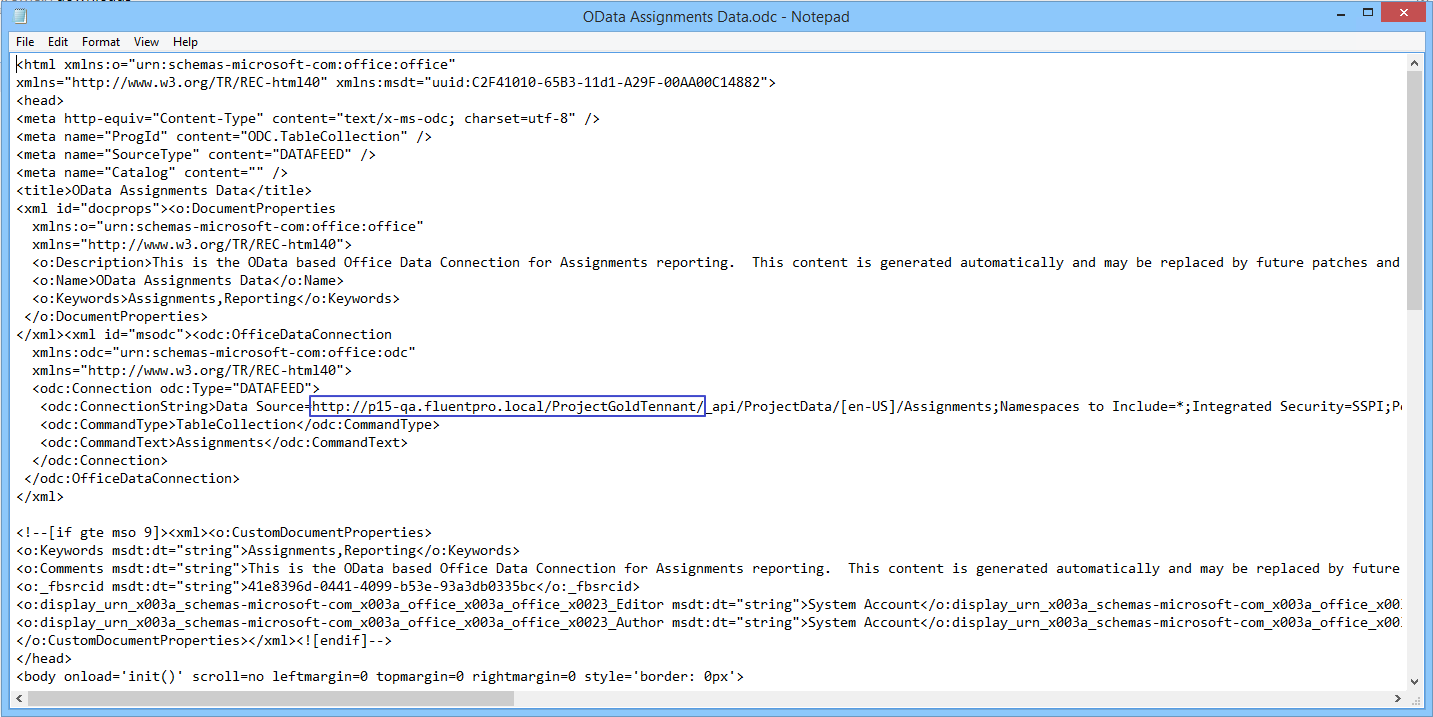
NOTE about processing Excel Reports and ODC files during import:
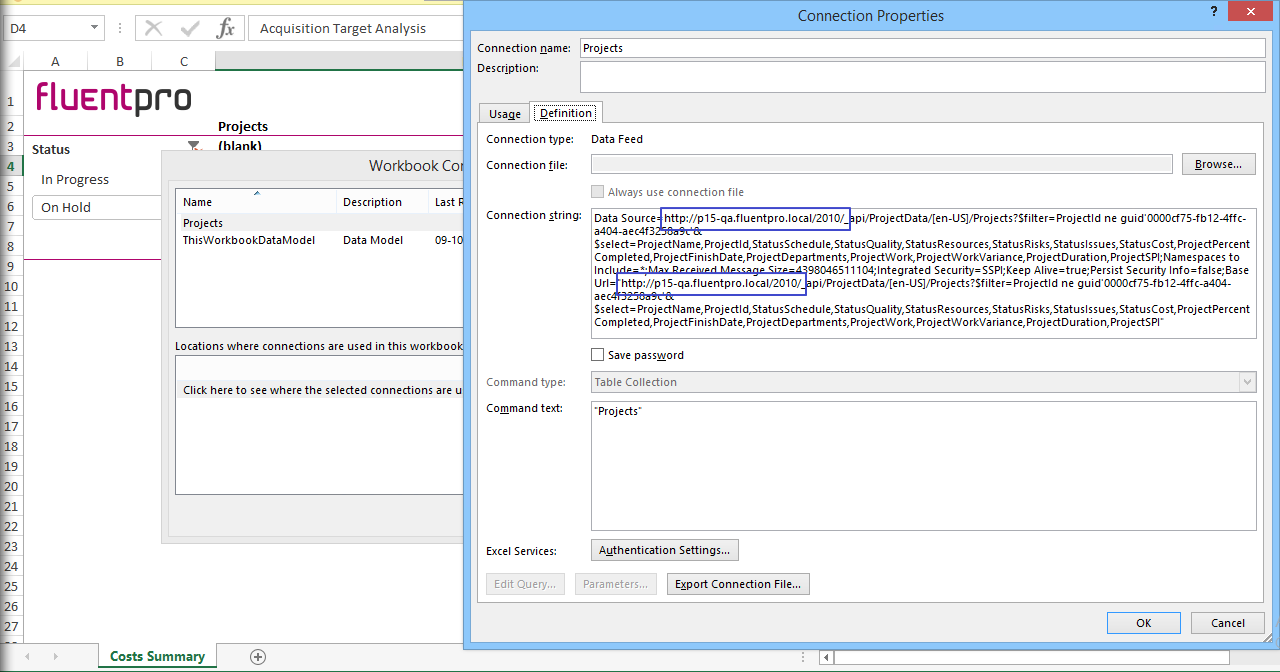
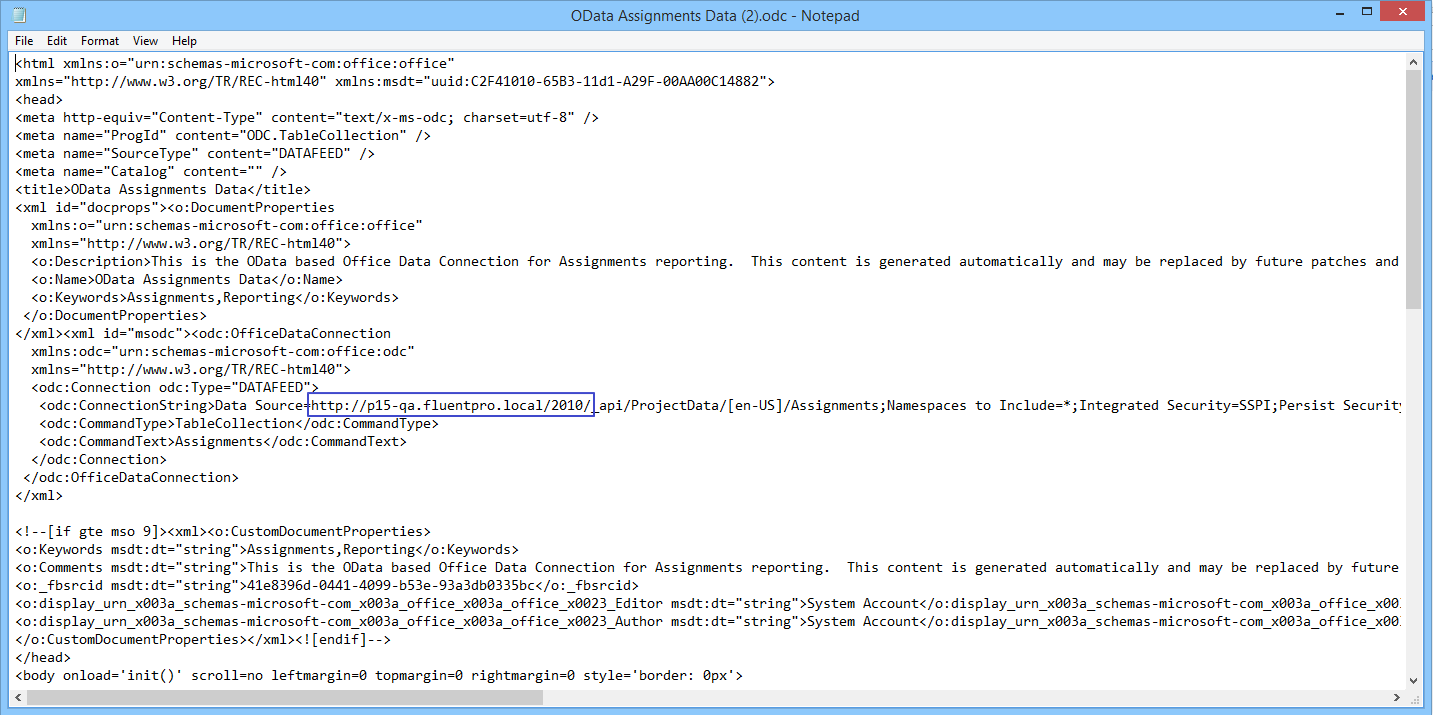
During import, all Excel Reports and ODC files will be processed and Data Source URLs will be updated from the source PWA URL to the target PWA URL. Please see below the examples of the Data Source URLs that will be updated.
NOTE about applying custom templates during export:
It is possible to apply a custom template only when creating a new site on the target PWA, but not when updating an existing site. Also, only templates that already exist on the target PWA can be applied to the sites when exporting SharePoint Sites, therefore, migration of the SharePoint Site with/without a custom template described in this article will be performed in 2 stages: the first template will be exported to the target PWA and then Sites will be exported and template will be applied during export.
The following PWA and its SharePoint Sites will be used as an example source PWA in this article:
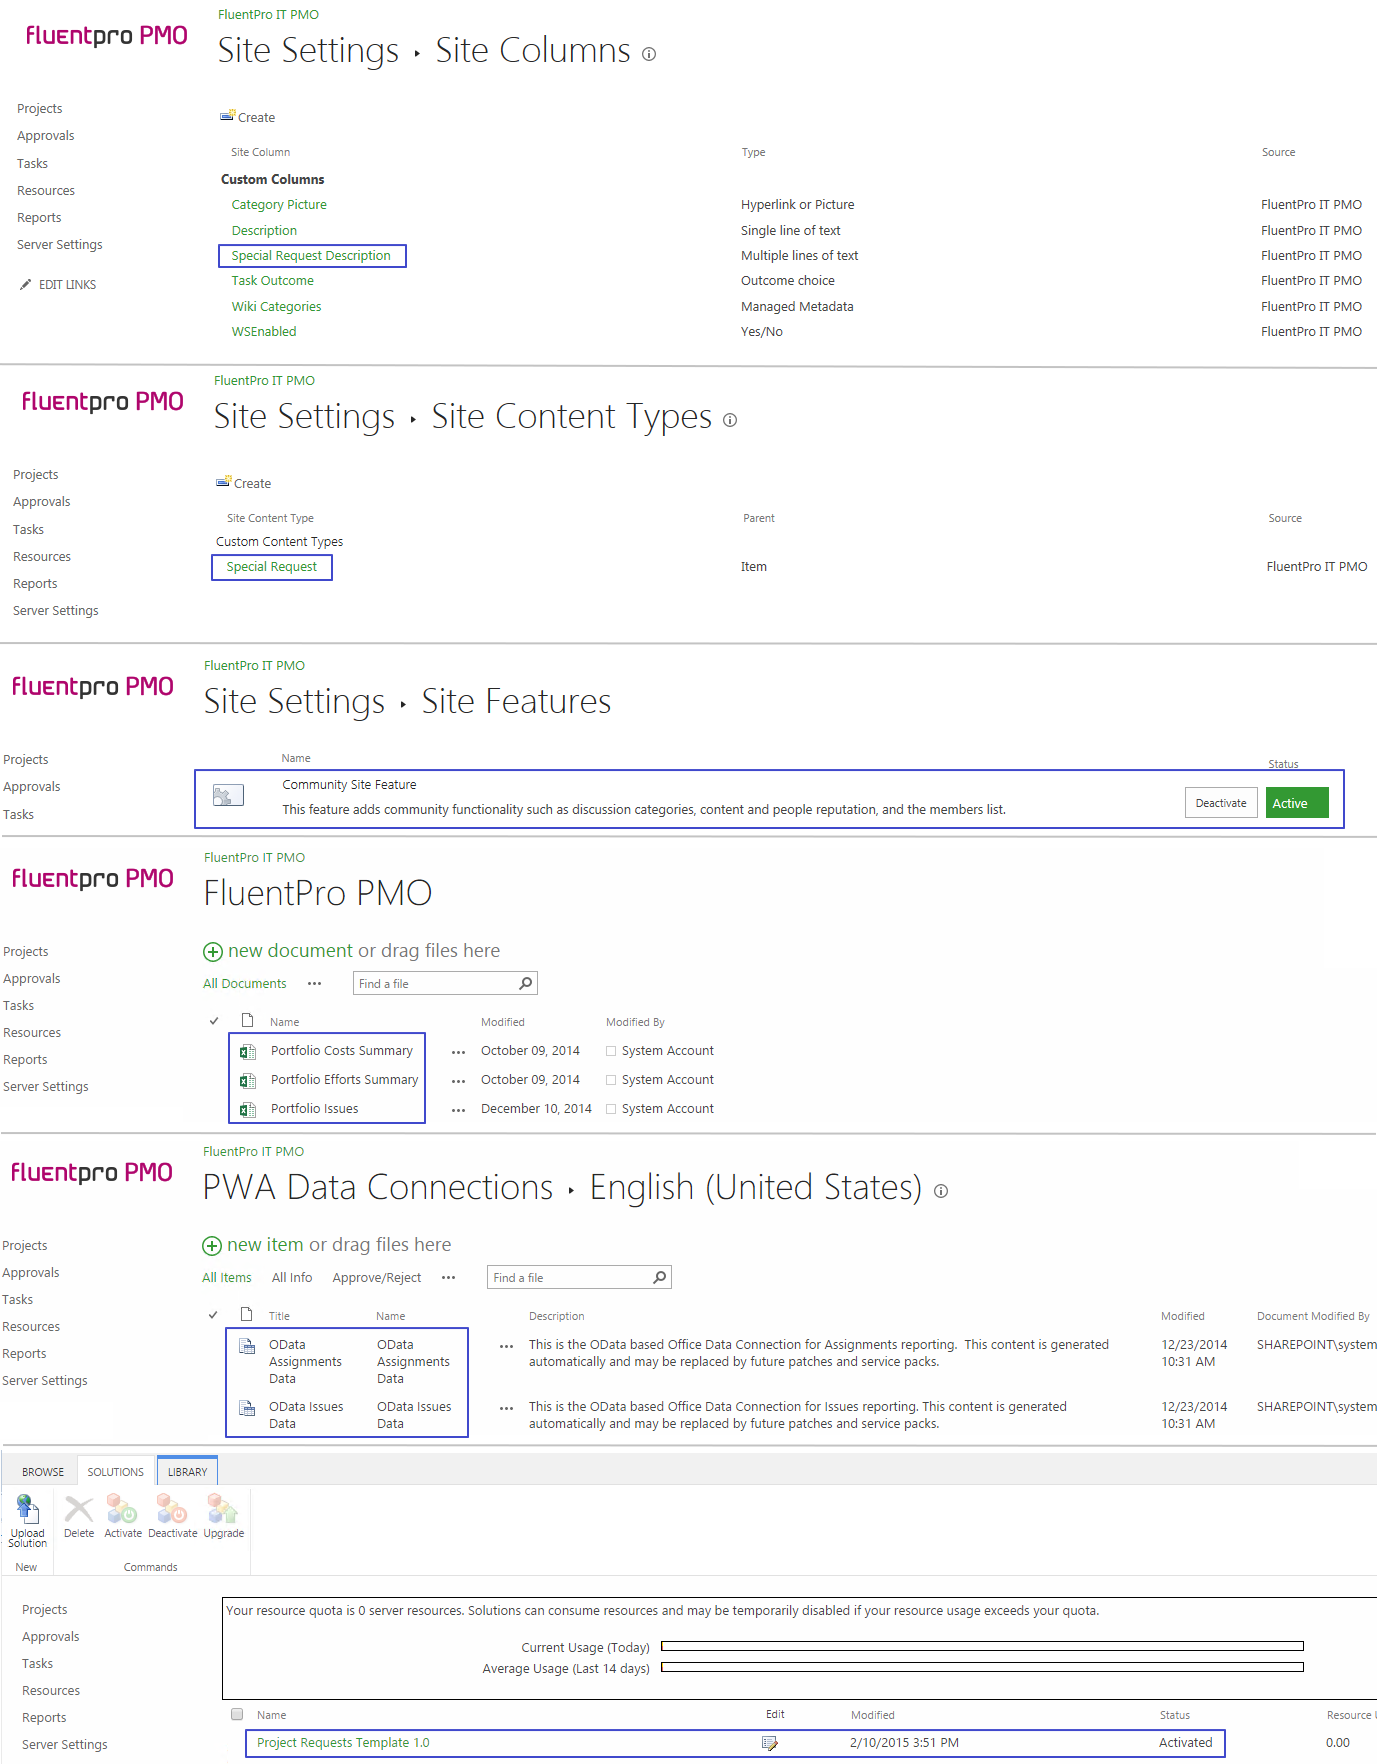
Root PWA Site: “FluentPro IT PMO”
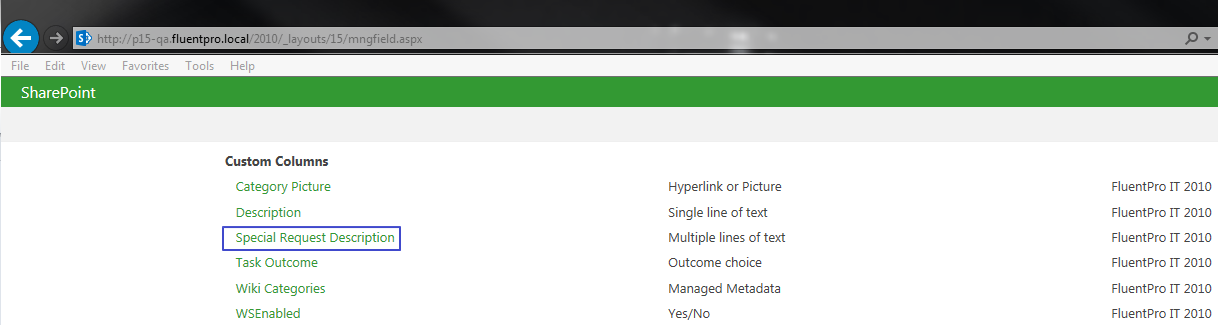
- custom Site Column: ‘Special Request Description’
- custom Content Type: ‘Special Request’
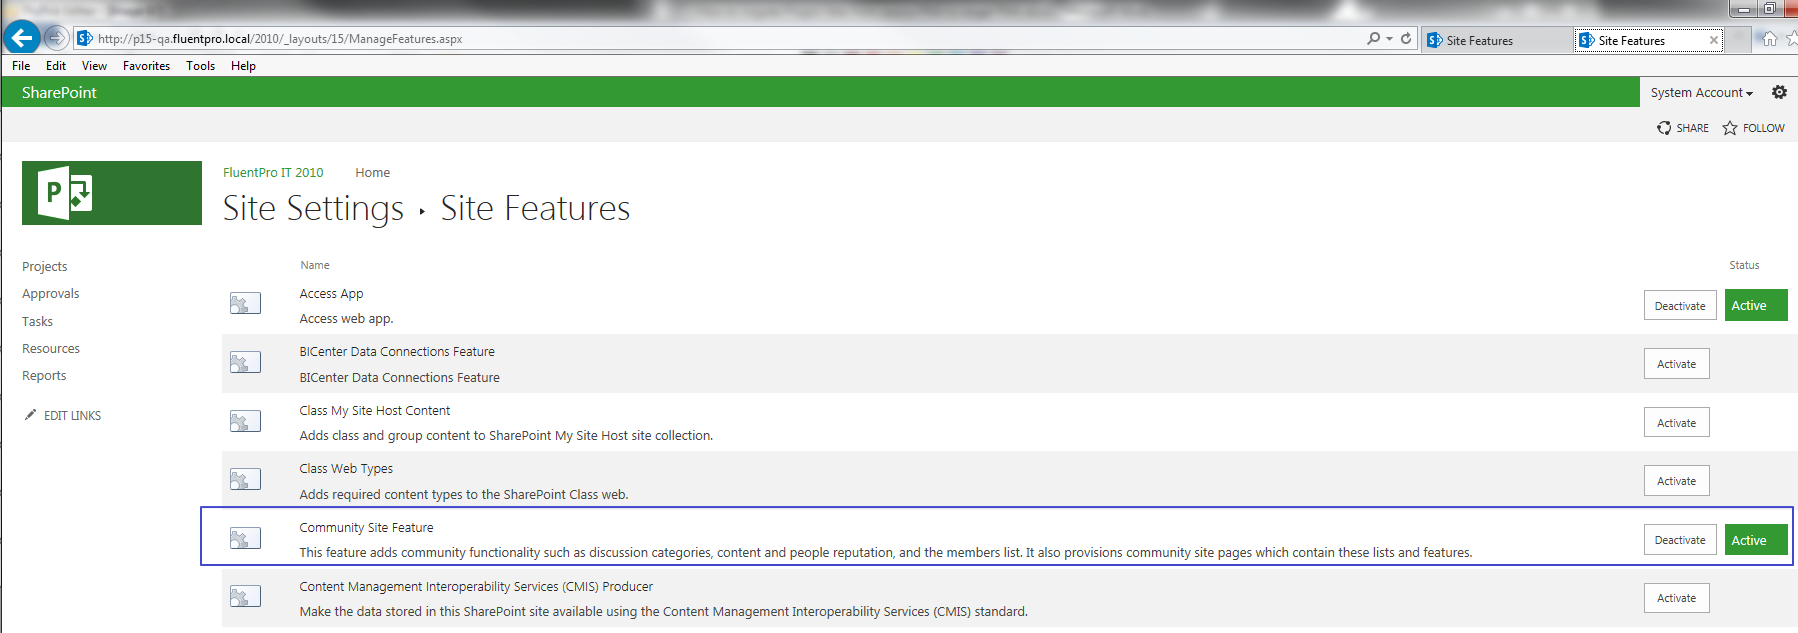
- Site Feature: ‘Community Site Feature’
- Excel Reports: are located in the FluentPro PMO Library
- ODC files: are located in the PWA Data Connections Library
- Solution: ‘Project Requests Template 1.0’
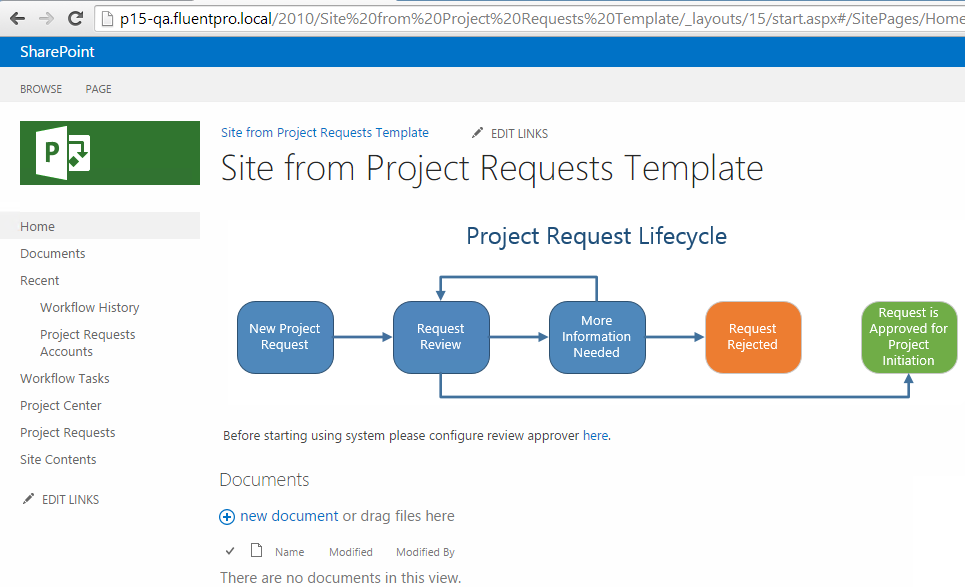
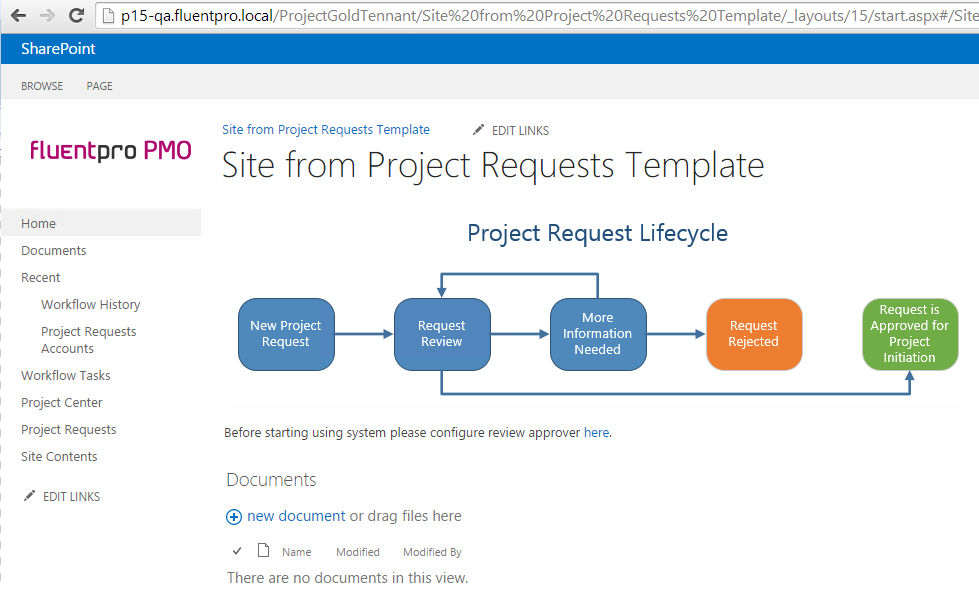
- SharePoint Site with custom template: ‘Site from Project Requests Template’
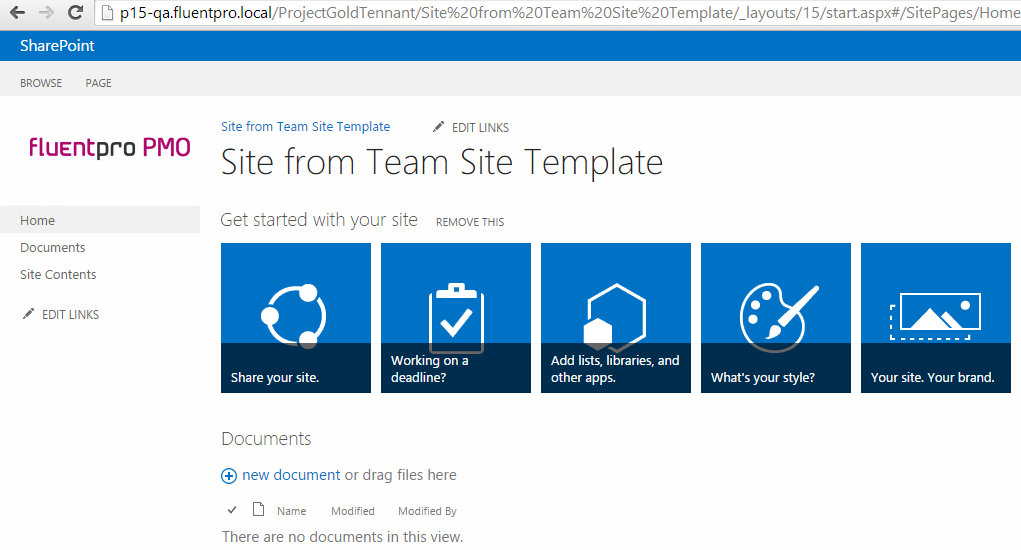
- SharePoint Site without custom template: ‘Site from Team Site Template’
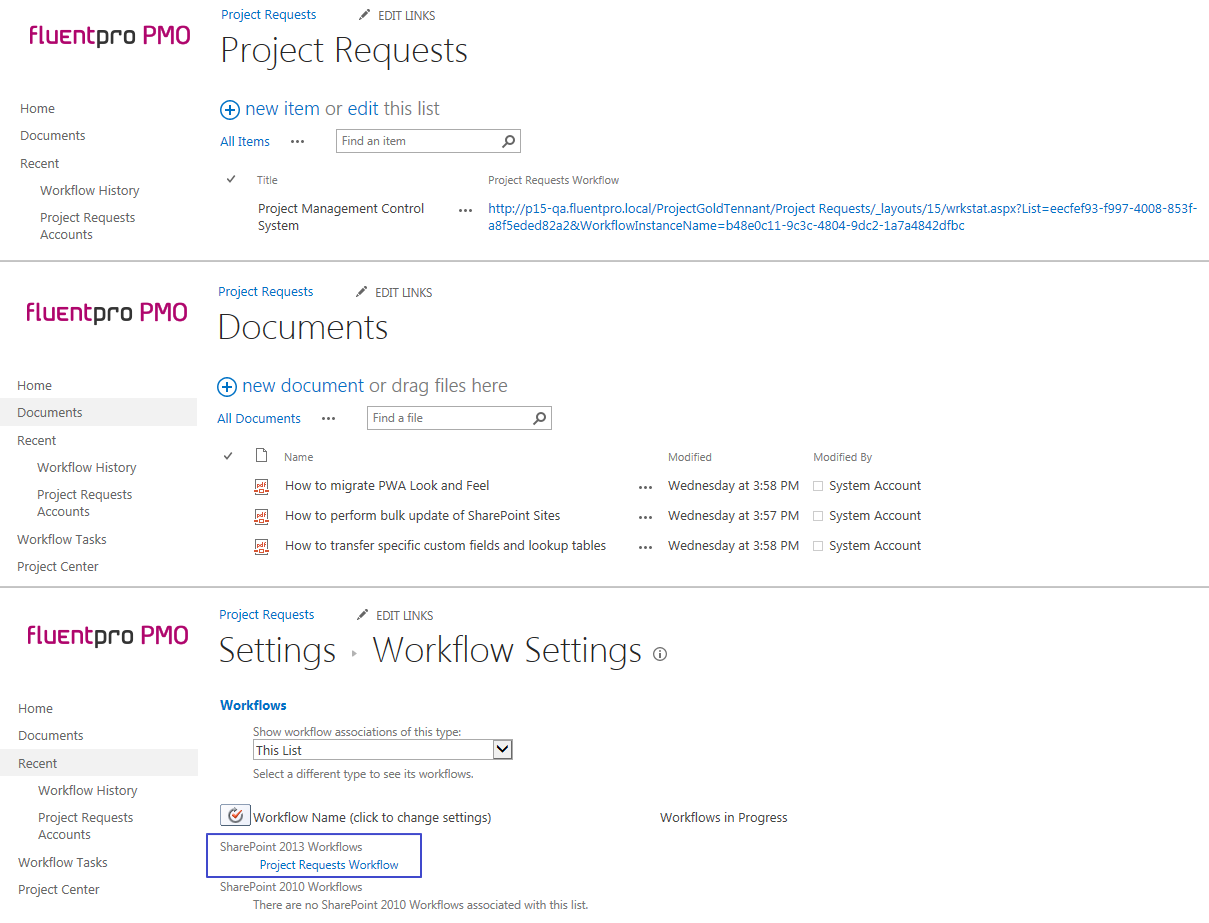
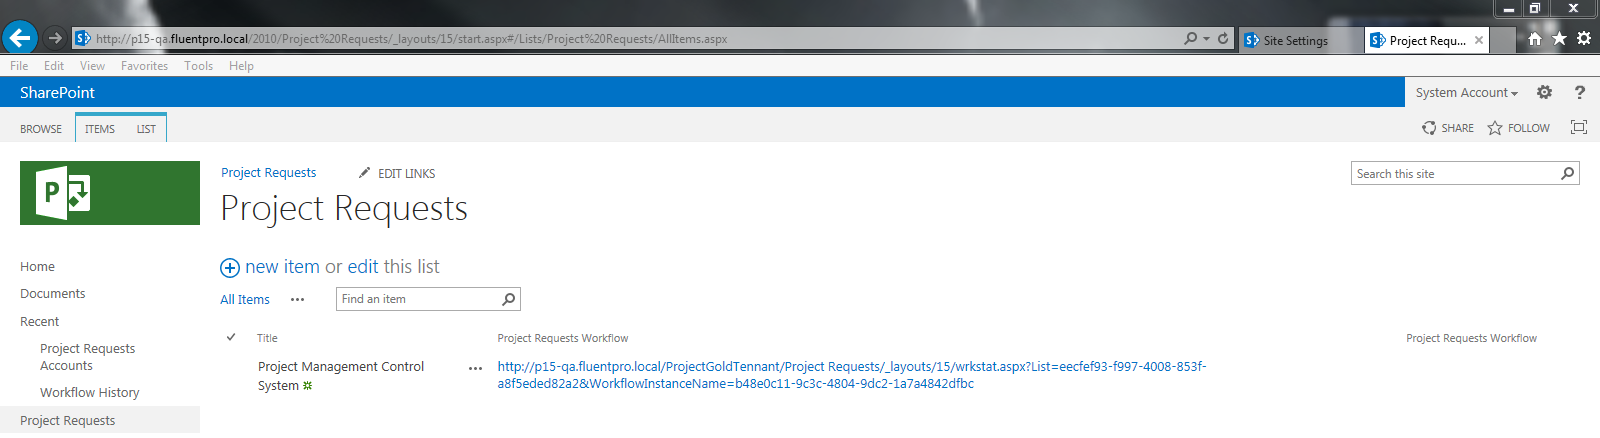
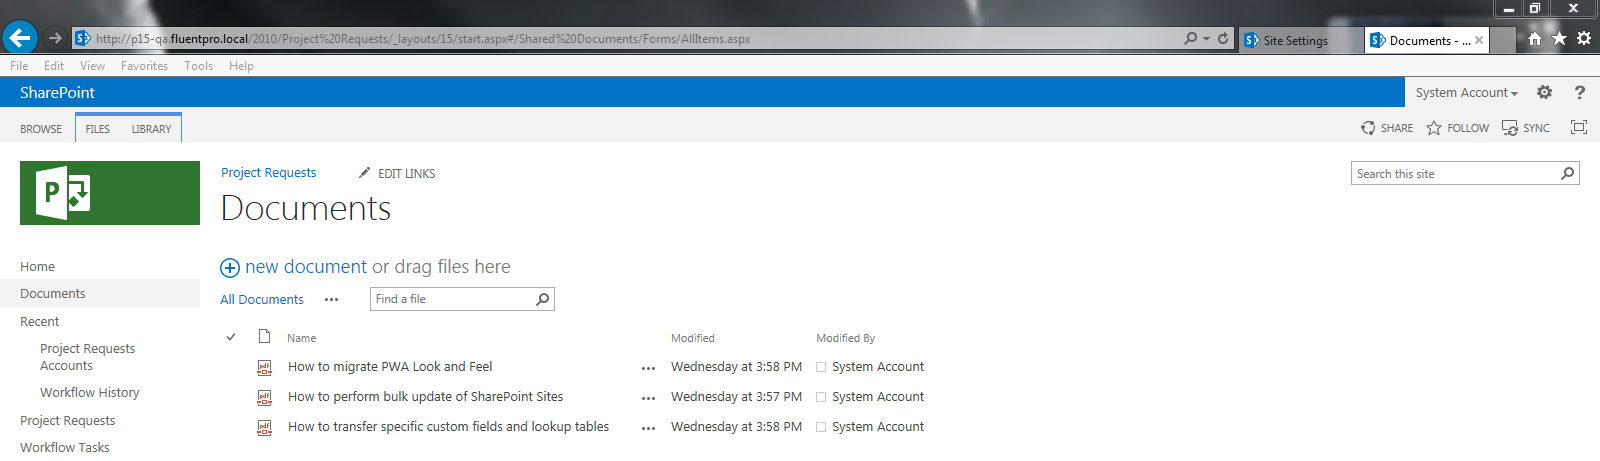
Subsite: “Project Requests”
- List: ‘Project Requests’ with 1 item in it
- Library: ‘Documents’ with 3 documents in it
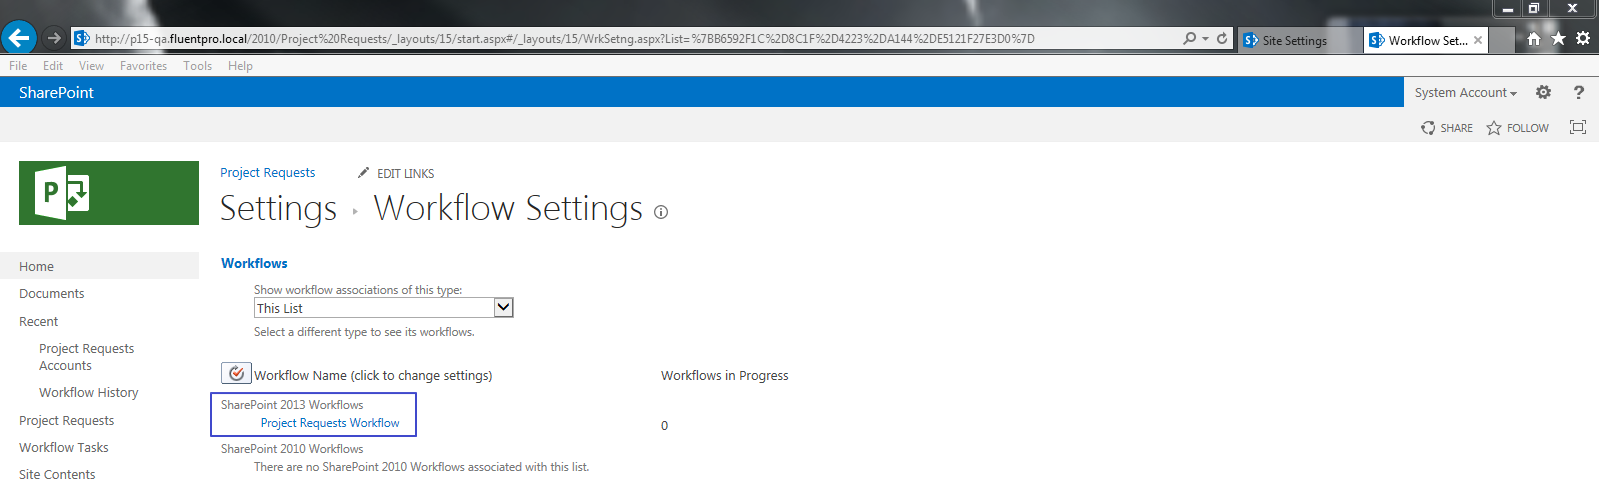
- List Workflow: ‘Project Requests Workflow’ associated with the ‘Project Requests’ List
Subsite with the custom template (‘Project Requests Template 1.0’): “Site from Project Requests Template”.
Subsite without custom template (‘Team Site’ template is applied): “Site from Team Site Template”.
Download(Import) Project Sites from the source PWA
The first step of the SharePoint Sites migration is to import these Sites from the source PWA, which can be easily done using the ‘Download(Import) SharePoint Sites’ wizard.
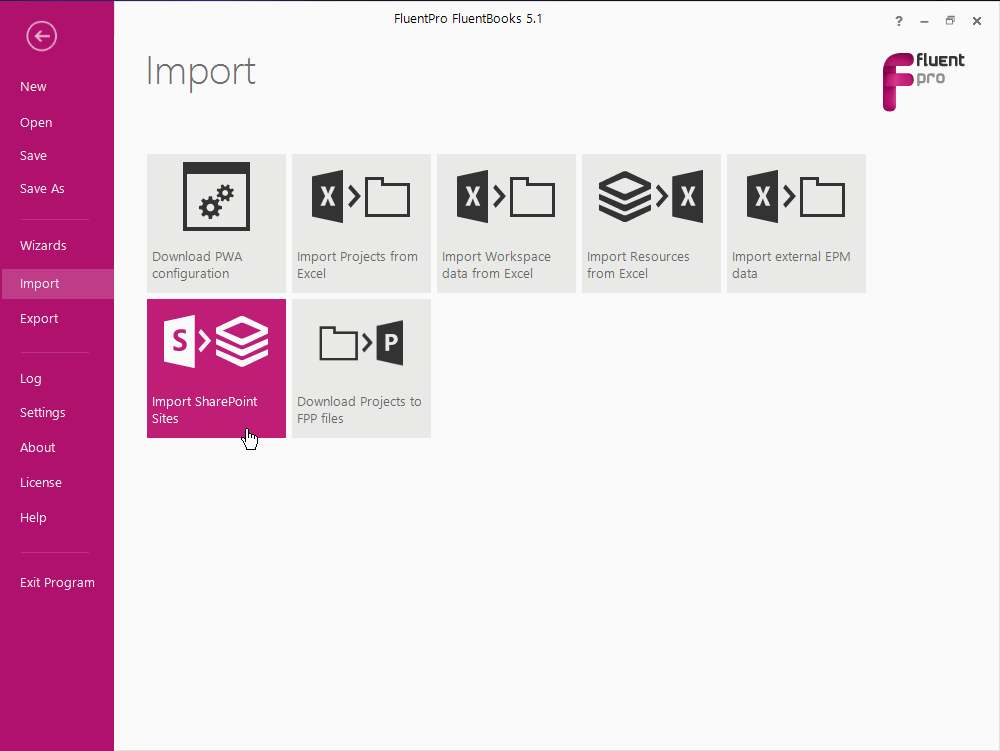
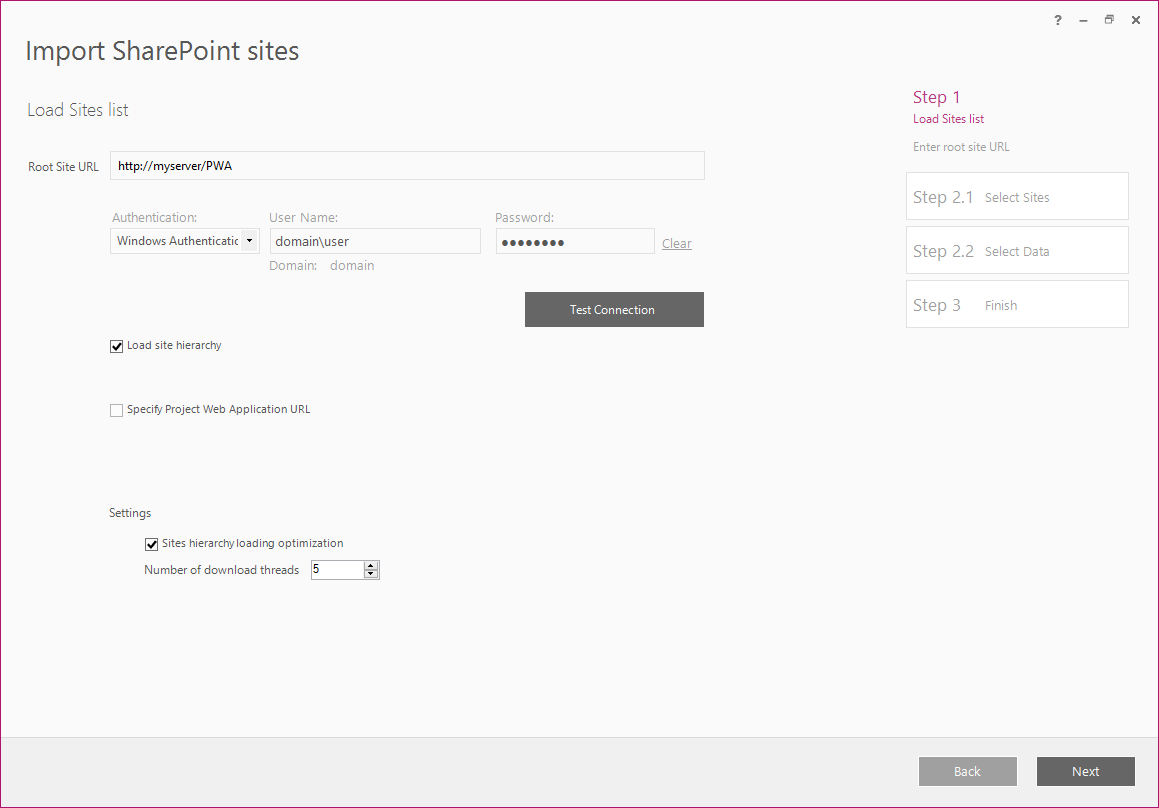
1. Run FluentBooks, select the Import option from the File menu, and then the ‘Download(Import) SharePoint Sites’ wizard.
2. Specify the Root Site URL of the source PWA, login credentials, and click Next to load the sites list.
Please note: User account that is used by FluentBooks when migrating SharePoint content should have Site Collection Administrator rights.
If the user account does not have Site Collection Administrator rights, then FluentBooks will not be able to create a new Site. The existing Site might be updated successfully, but it is strongly recommended to use a user account with Site Collection Administrator rights to avoid unexpected issues.
3. After the site hierarchy is loaded select all necessary sub-sites to be downloaded by checking their checkbox, the Root Site will be checked automatically if any of the subsites is checked. Click Next to proceed.

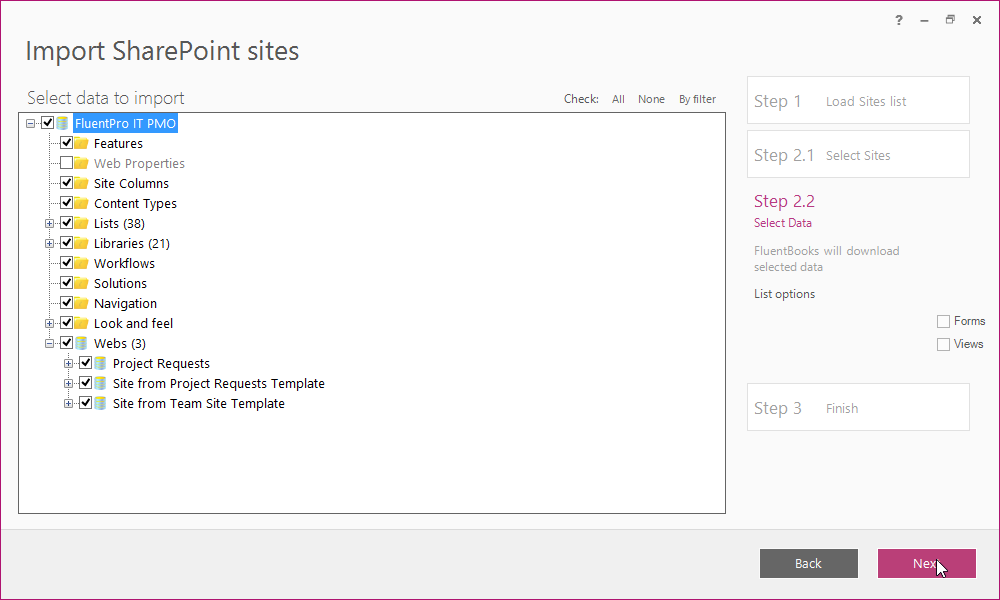
4. Select the SharePoint Site data to be imported from the source PWA:
- ‘Features’ to migrate Site Features
- ‘Fields’ to migrate Site Columns
- ‘Content Types’ to migrate Site Content Types
- ‘FluentPro PMO’ and ‘PWA Data Connections’ libraries to migrate Excel Reports and ODC files
- ‘Solutions’ to migrate templates
- ‘<Site Title>’ to migrate the Site
- ‘<List Title>’ to migrate the List
- ‘<Library Title>’ to migrate the Library
Please note: When migrating Lists/Libraries it is possible to transfer just their structure without items by checking ‘Settings’ for the List/Library and unchecking ‘N item(s)’. If ‘N item(s)’ are checked then List/Library structure and all the items will be imported.
- ‘Workflow’ to migrate the Workflow
Please note: When migrating a List Workflow it is also necessary to select the dependent lists (‘Project Requests Accounts’, ‘Workflow History’ and ‘Workflow Tasks’ in this example) from the ‘Lists’.
Click Next to start the import process.
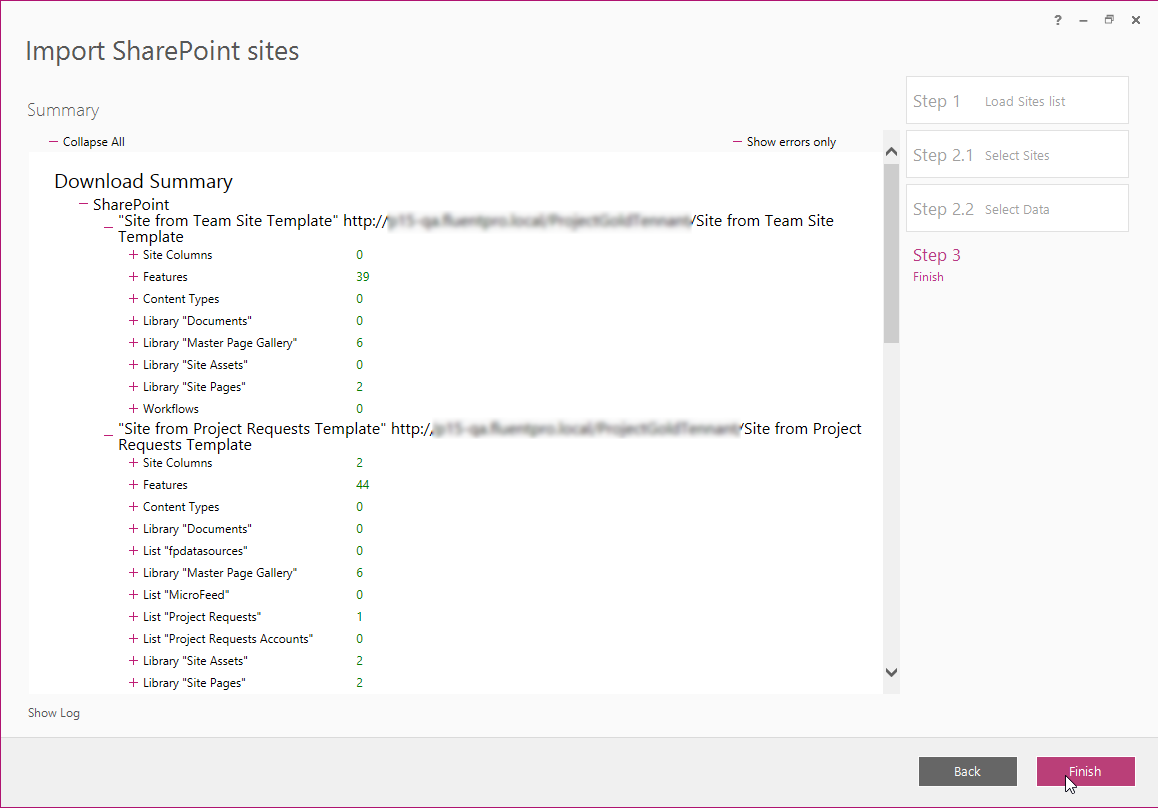
5. The Imported sites displayed after the import process is finished will show the SharePoint Sites that were imported from the source PWA. Click Finish to complete this step.
Upload(Export) Project Sites to the target PWA
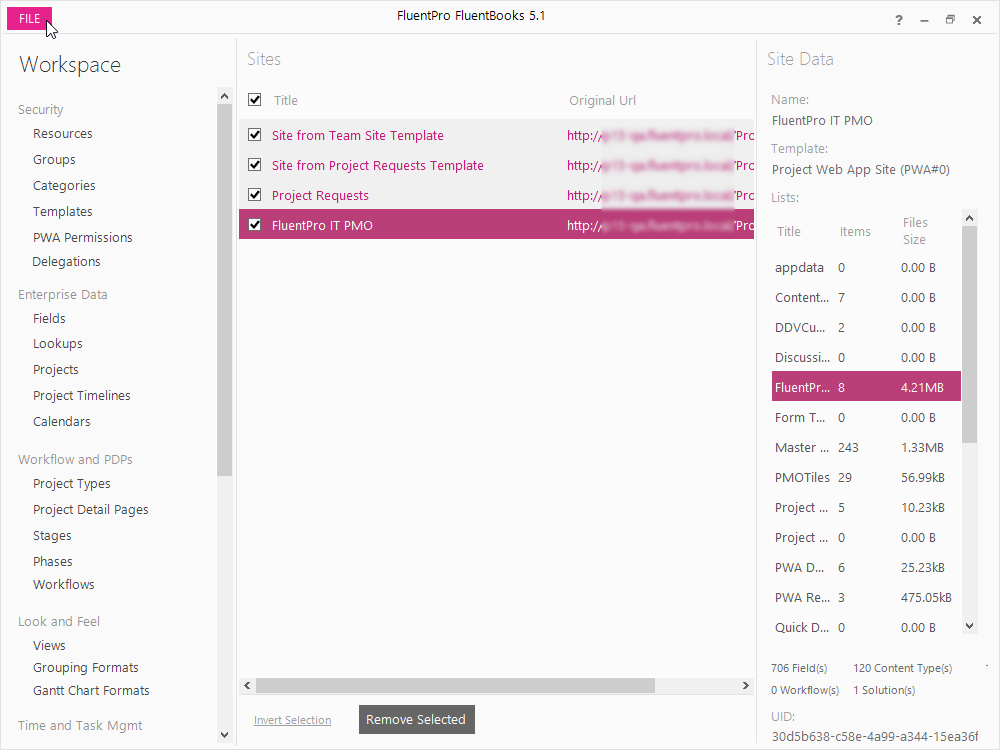
SharePoint Sites imported from the source PWA are shown on the Workspace and are now ready to be exported to the target PWA.

1. Select the Sites to be exported checking their check-box, then click the Export option from the File menu to start the export process.
2. Select the ‘Upload(Export) SharePoint Sites’ option from the Export menu.
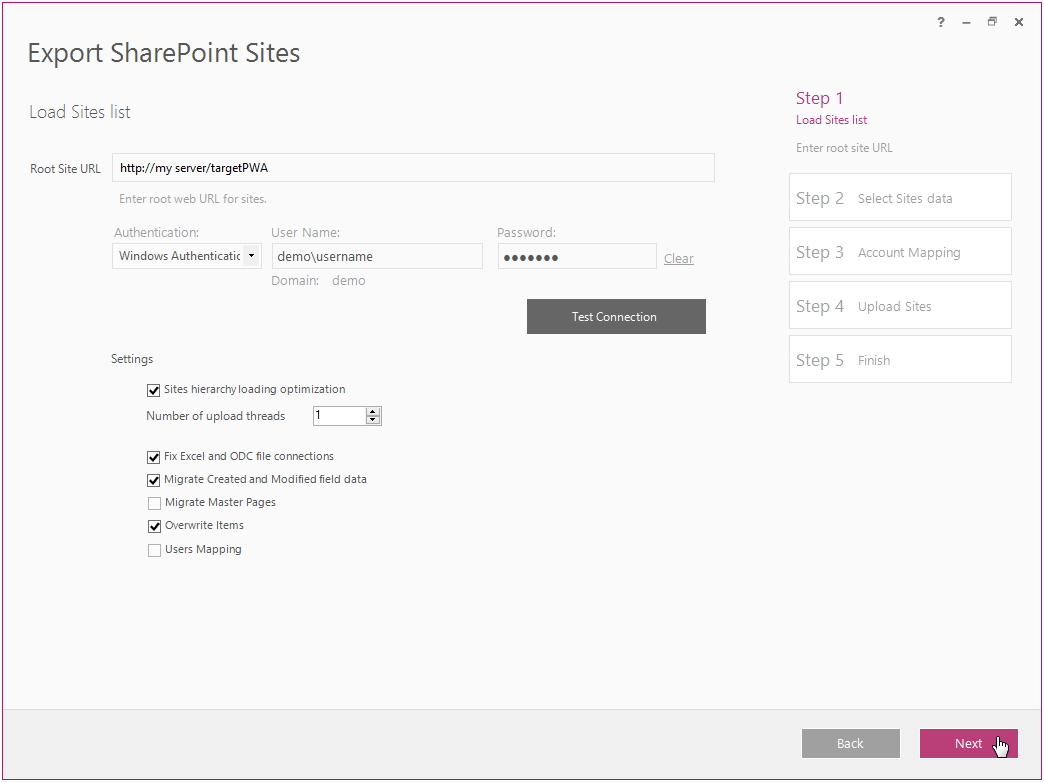
3. Specify the Root Site URL of the target PWA, login credentials and click Next to load the sites list.
Please note: User account that is used by FluentBooks when migrating SharePoint content should have Site Collection Administrator rights.
If the user account does not have Site Collection Administrator rights, then FluentBooks will not be able to create a new Site. The existing Site might be updated successfully, but it is strongly recommended to use a user account with Site Collection Administrator rights to avoid unexpected issues.
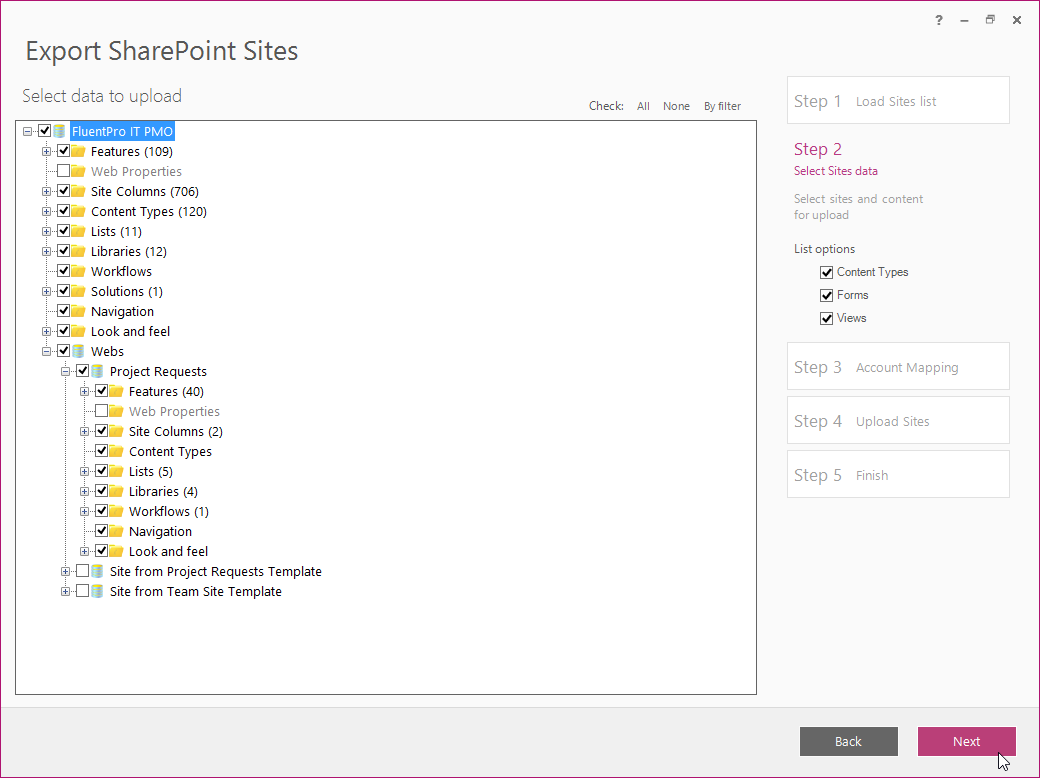
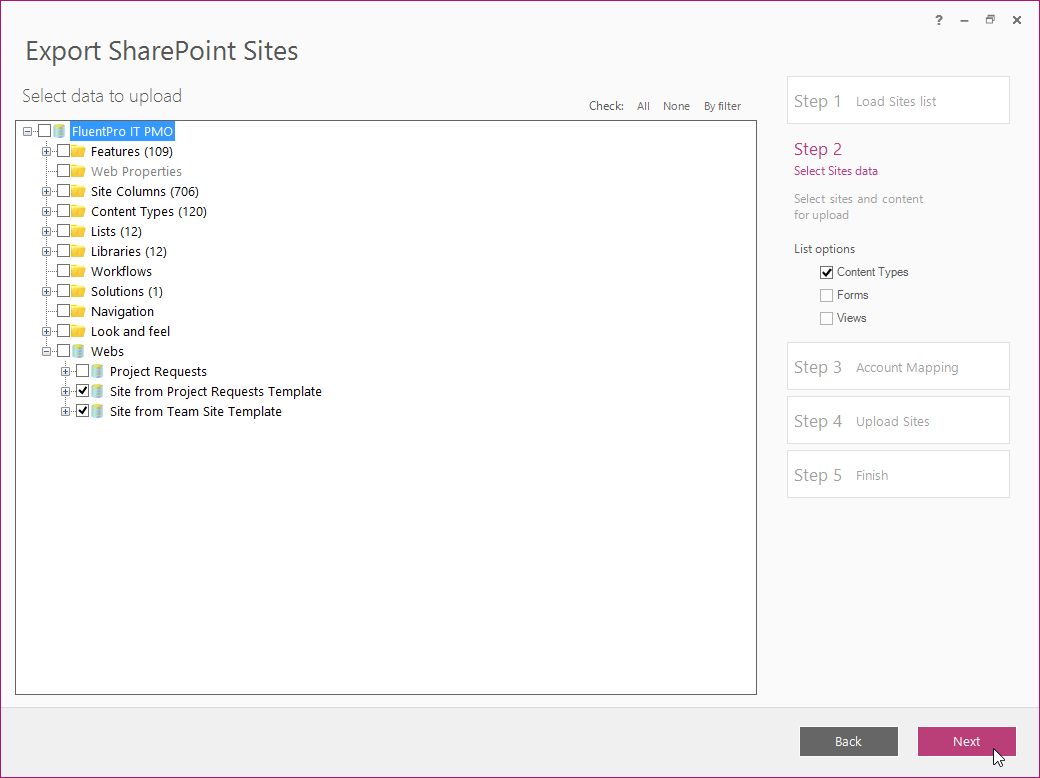
4. Select the SharePoint Site data to be exported to the target PWA: all necessary data is selected by default, but the Site with the custom template and the Site without the custom template to which template will be applied during export should be unchecked, they will be exported later.
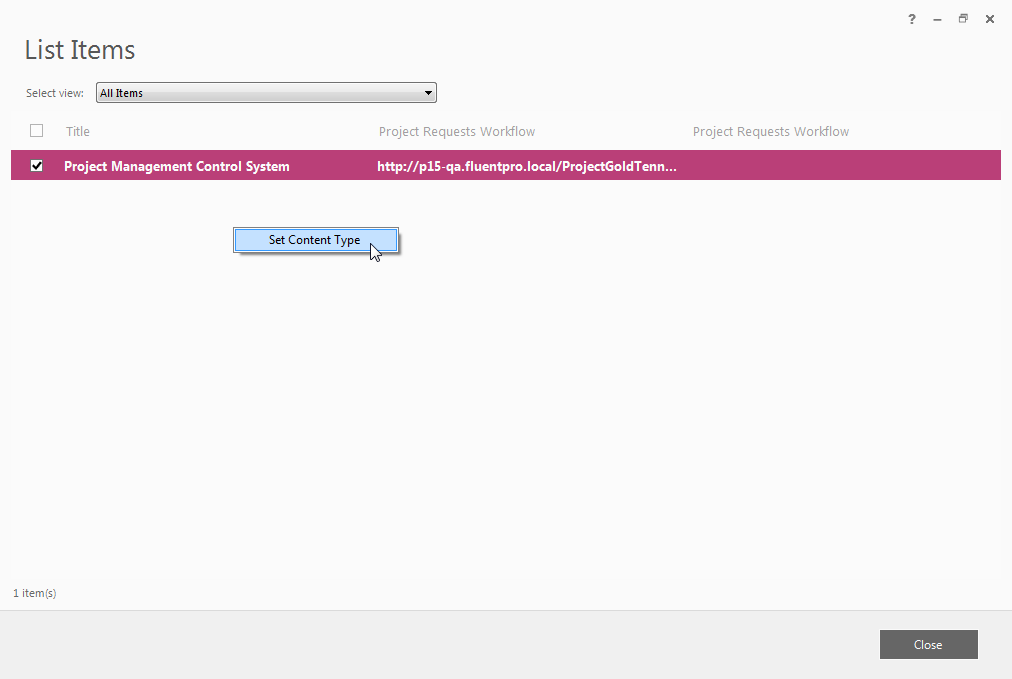
Please note: Double-click on the List/Library opens the items selection window which allows choosing which items should be uploaded. It is also possible to change the content type for the item by clicking ‘Set Content Type’ in right-click context menu.
It is possible to update the content type for existing List/Library items.
When updating existing Lists and Libraries on the target PWA none of the existing items/documents will be removed, new items and documents will be added and duplicates will be merged. It is possible to update the following settings inside the Lists and Libraries: content types, columns and views. Just like with items/documents none of the existing setting elements will be removed, new ones will be added and duplicates will be merged.
After all necessary data is selected click Next to proceed to the next step.
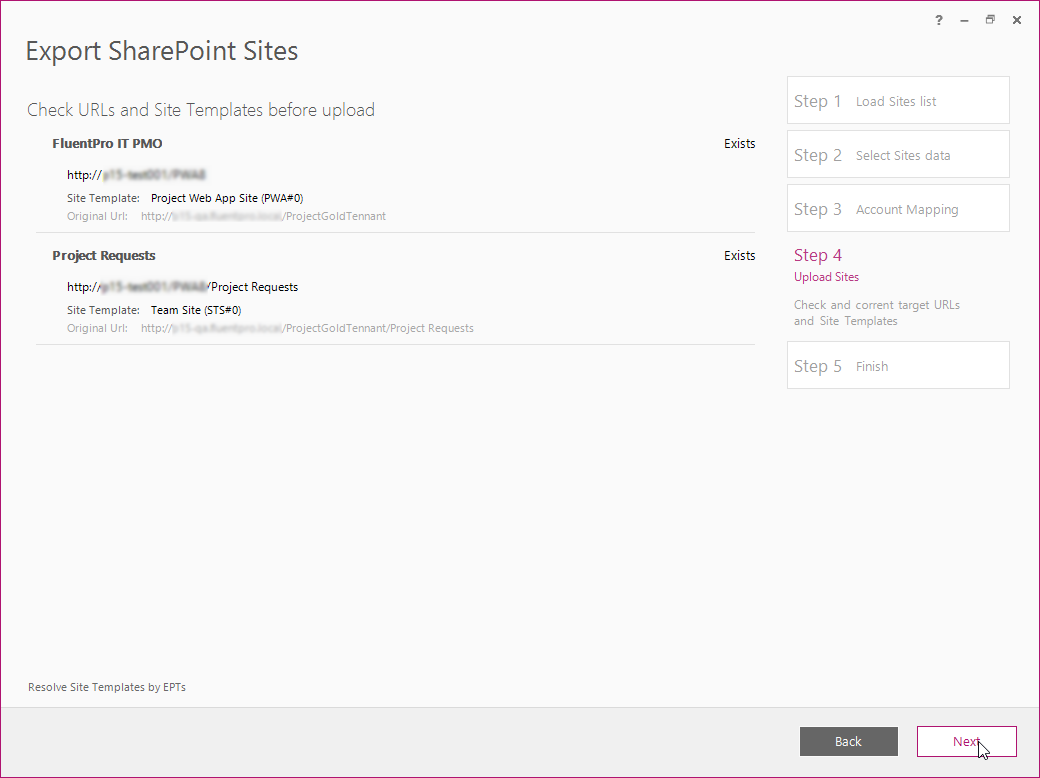
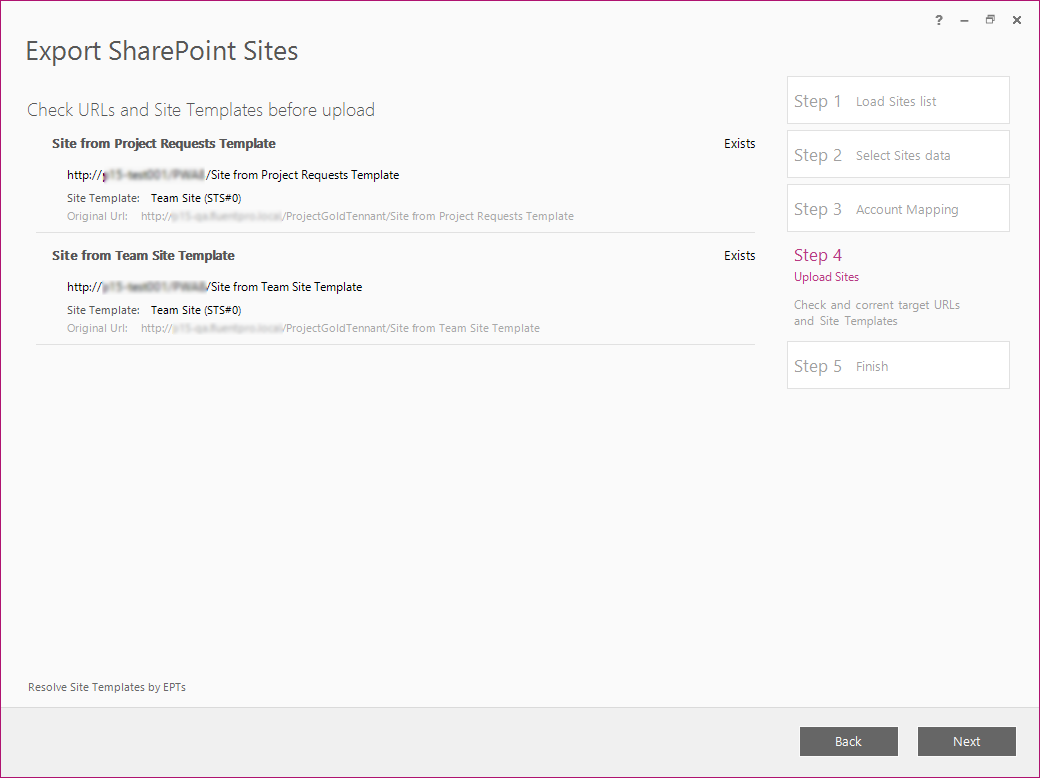
5. Check that the correct URLs and Site Templates are shown. Change the URL and the Site Template if necessary. Click Next to start the upload process.
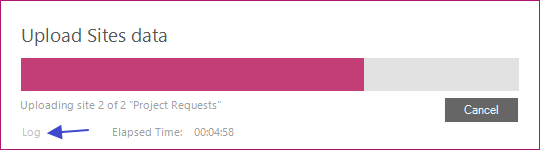
6. Review the log file for the errors after the Sites data upload is completed by clicking the Log link. Then click Close to close this window.
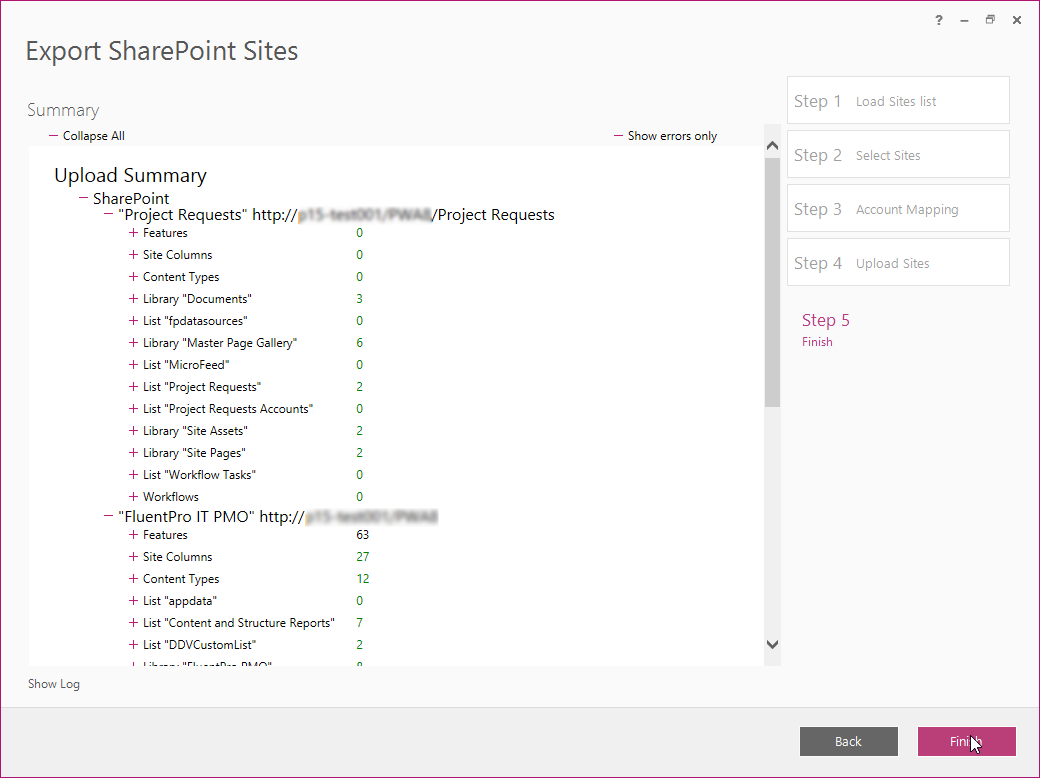
7. The Exported sites displayed after the upload process is finished will show the SharePoint Sites that were exported/updated on the target PWA.
8. Click Back twice to go back to the ‘Select Sites data’ step. On this step click None to uncheck all the data and manually select the Site with the custom template and the Site without the custom template to which template will be applied during import. Click Next to proceed.
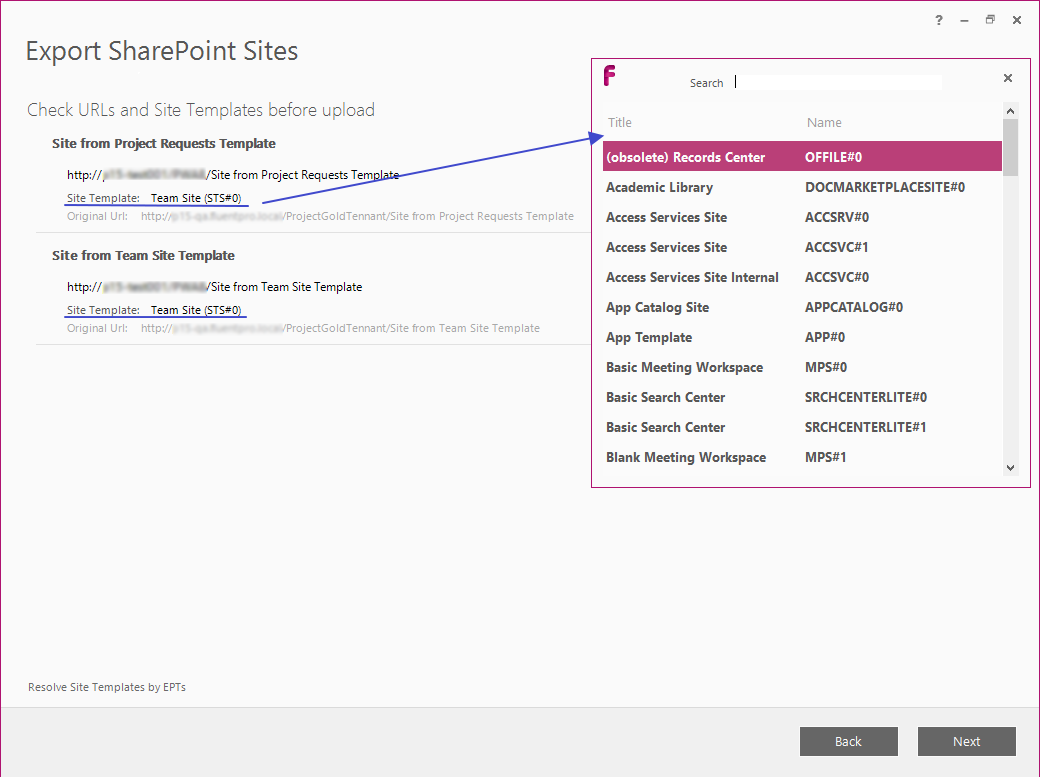
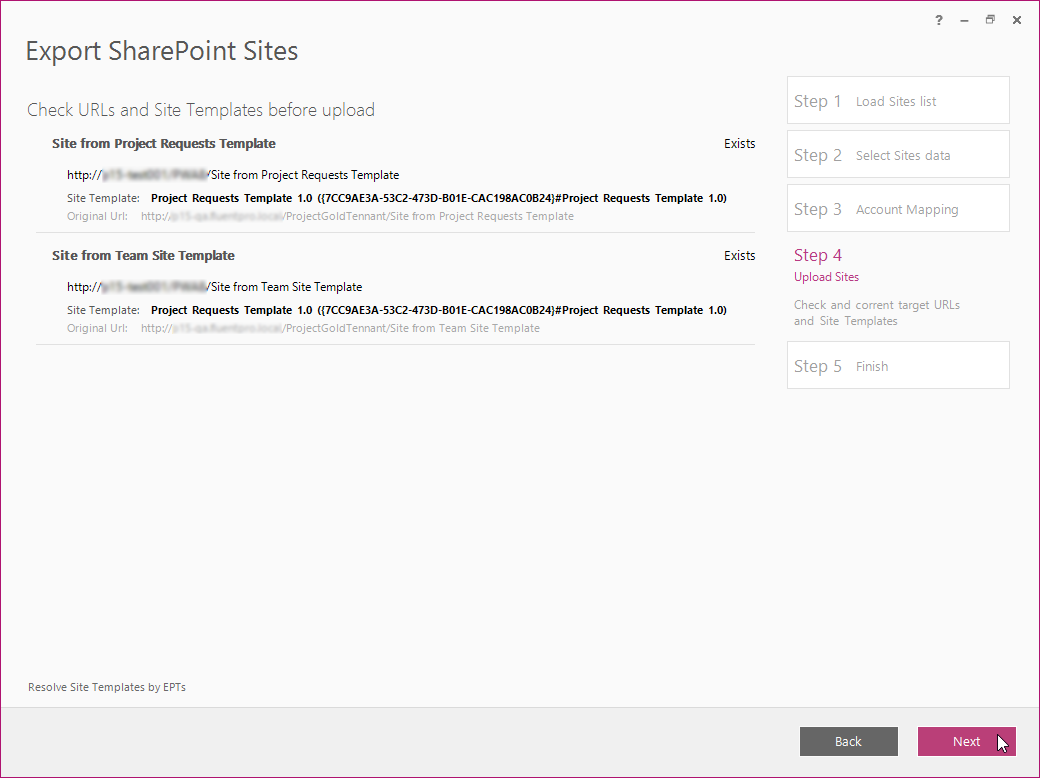
9. Check the URLs and Site Templates. The Site Template can be changed on this step. Please note that custom template is not applied to the site automatically, it should be updated manually.
To do this click on the template title and select the desired template from the list. The template can be searched by its title in the Search field. Double-click on the template to apply it to the Site.
After all Sites have correct templates set click Next to proceed.
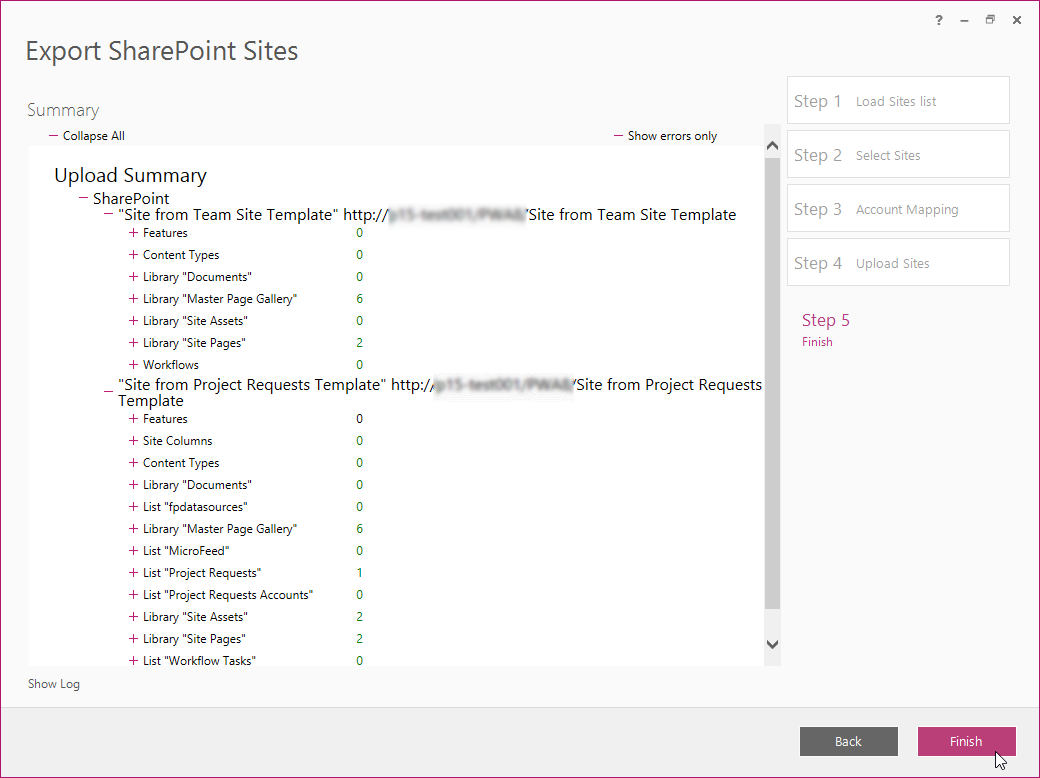
10. The Exported sites displayed after the upload process is finished will show the SharePoint Sites that were exported to the target PWA. Click Finish to complete.
11. Navigate to the target PWA and make sure that all the necessary SharePoint Sites and their components were migrated from the source PWA:
Lists & Libraries, Content Types, and Site Columns were migrated;

Site Featureswere activated;
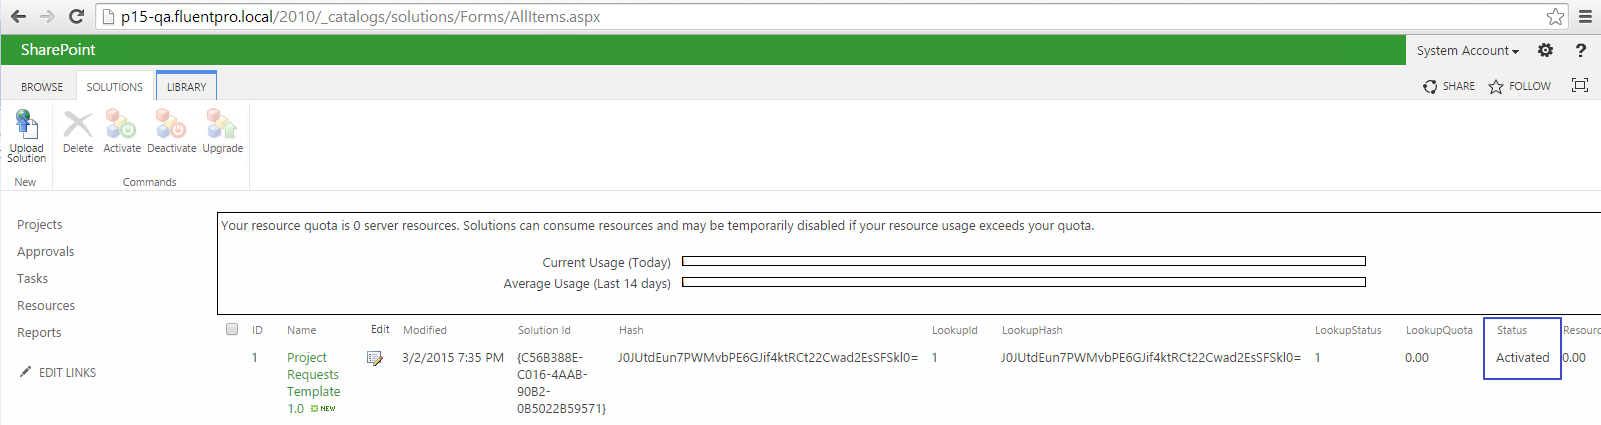
Solutions were migrated and activated;
List Workflows were migrated and associated with Lists;
Excel Reports and ODC files were migrated ad URLs were updated in them;
Sites were migrated and the correct template was applied to them.