
Storyboard Management allows to perform the following operations on storyboards:
- create a new storyboard;
- edit an existing storyboard;
- delete storyboard (one/multiple);
- export storyboard (one/multiple) to package;
- import storyboard from package.
To access Storyboard Management select the Storyboard Management option from the EPM Pulse Settings menu:

Creating New Storyboards
To create a new storyboard:
1. Open Storyboard Management.
2. Click the  button.
The Storyboard Details pop up window appears.
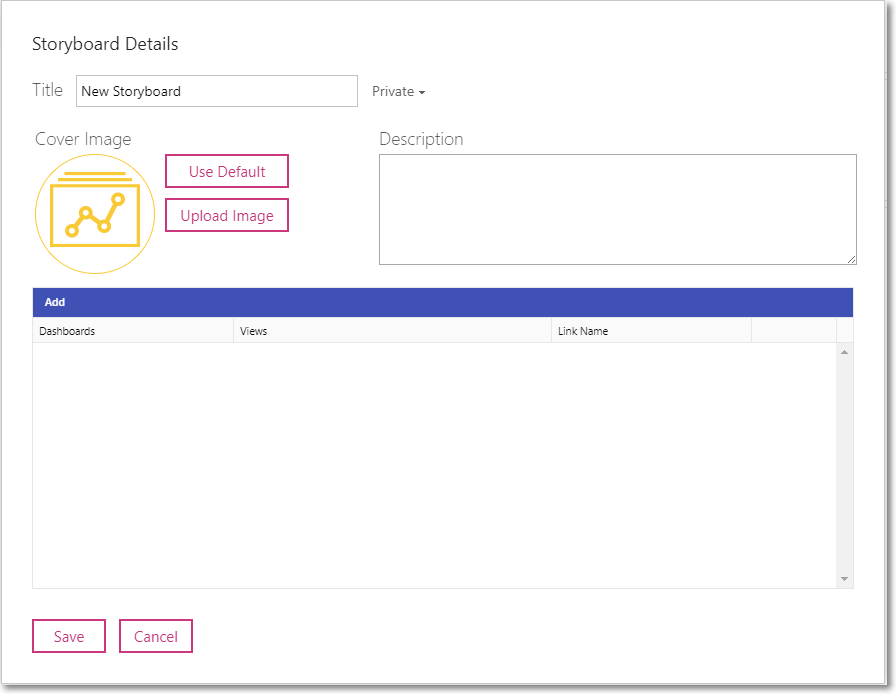
3. Provide a title for the storyboard and a description (not mandatory). Upload an image for the storyboard cover if needed (jpg, png, bpm, gif and jpeg formats are supported), otherwise, default image will be used. To clear up the uploaded image click the Use Default button.
4. Click the  button to add a new row to the table.
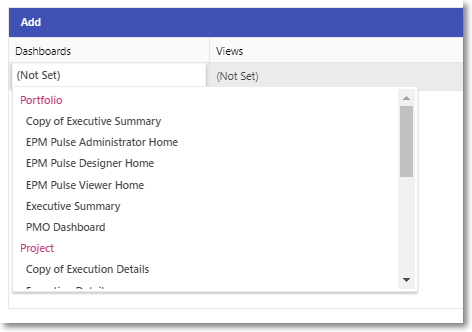
5. In this new row click (Not Set) in the Dashboards column and select a dashboard in the appeared drop down list. Dashboards in the list are split into 4 groups: Portfolio, Project, ResourcePool and Resource.
Each row in the table can contain only one dashboard. To add more dashboards to the storyboard use the button. To delete a dashboard from the storyboard click the Delete button in the corresponding row.
6. Click (Not Set) in the Views column and select views in the appeared drop down list. Drop down will display only those views that correspond to the type of the selected dashboard – Project or Resource.
It is possible to select multiple views for each dashboard in the storyboard. It is also possible to leave the Views column as (Not Set).
7. The Link Name column displays the dashboard title by default, this is the name under which the dashboard will appear in the storyboard. To change the link name click the existing link name and type in a new name.
8. After all necessary dashboards and views are added to the storyboard and other details are provided, storyboard can be saved by clicking the  button.
To abort the process of storyboard creation click Cancel.
Editing Storyboards
To edit an existing storyboard:
- Open Storyboard Management.
- In the storyboards list check the dashboard that needs to be edited and click the
 button. Please note that it is possible to edit only one storyboard at a time, if several storyboards are checked, then the Edit button will be disabled.
 - Once the Storyboard Details pop up window is opened, make the necessary changes and click the button. To abort editing click Cancel.
Deleting Storyboards
To delete one/multiple storyboards:
- Open Storyboard Management.
- In the storyboards list check one/multiple storyboards that need to be deleted.
- Click the Delete button.
- In the dialog window click OK to confirm deletion or Cancel to abort deletion.

Exporting Storyboards To Packages
Please note: All storyboards selected for export will be saved into one .zip file.
To export one/multiple storyboards to a package:
- Open Storyboard Management.
- In the storyboards list check one/multiple storyboards that need to be exported.
- Click the Export button.
- Save .zip file to disk renaming it if needed.
Importing Storyboards From Packages
Please note: If the storyboard, any of the dashboards or views that are going to be installed from the storyboard package already exist, then they will be overwritten during the import. There is no undo available.
To import a storyboard package:
- Open Storyboard Management.
- Click the Import Storyboards button.
- Select a storyboard package (.zip file) that needs to be imported.
- Check storyboard details in the pop up window and click Next to proceed. The Exists column shows if the storyboard already exists. The Link column contains the link(s) to the storyboard(s).

5. Check the details of the dashboards that will be installed from the storyboards package and click Next to proceed.
The Exists column shows if the dashboard already exists. The Link column contains the link(s) to the dashboard(s).

6.Check the details of the views that will be installed from the storyboards package and click Next to proceed.
The Exists column shows if the view already exists. The Usage column contains the links to the storyboards where the view is used.

7. Check the details of the widgets that will be installed from the storyboard package and click Finish to confirm the import of the storyboard.
The Exists column shows if the widget already exists. The Usage column contains the links to the dashboards where this widget is used.

After the import is completed, the storyboard from the package will appear in the list of storyboards on the Storyboard Management page. Or in case of overwriting the existing storyboard, the storyboard in the list will be updated.