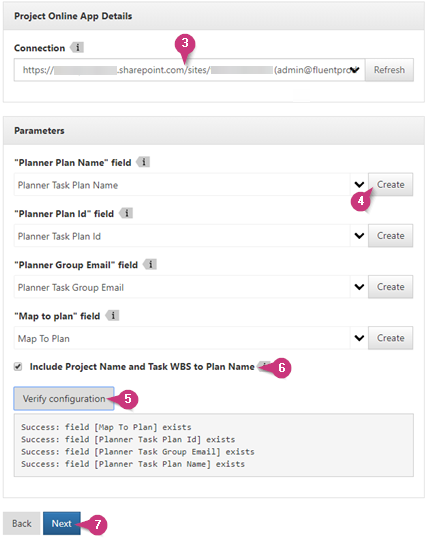
To configure Project Online <> Planner (Two-way project stages) integration scenario perform the following:
1. Open the Integration Hub application.
2. Click the New Integration button on the Integrations > Scenarios tab.

2. Select Project Online <> Planner (Two-way integration with project stages). The scenario creation wizard will open.

3. In the Connection field click New and provide the URL of the Project Online PWA you would like to establish a connection to. Alternatively, select an existing URL from the drop-down list.
In Project Online connection there are three authentication options:
-
OAuth
The 'OAuth' authentication type is a standard and preferred option. When it is used, Integration Hub is authorized to access your resources without sharing credentials. The access token is issued to the Integration Hub app by the authorization server, with approval from your side. Integration Hub then uses the access token to access and process your Project Online data and stores the refresh token for continuous integration.
Please note: If you are creating the first Integration Scenario in your Integration Hub tenant and choosing the OAuth authentication type, there might be a problem with the connection to Project Online. If a problem occurs, as a workaround, we recommend creating the first scenario using SharePoint credentials. When the first scenario is created, later on, you can change the authentication type of this scenario for the OAuth authentication type as well, if required. -
SharePoint Online credentials
If the ‘SharePoint Online credentials’ authentication type is selected a connection will be set up via login and password to a connected SharePoint account. In this case, the credentials are stored and protected in the Integration Hub app. Login to the PWA and please make sure that the account used for running integrations has the necessary set of permissions. -
SharePoint On-premise credentials
This type is used for Project Server 2019 and is available for Integration Hub on-premises version only. If this type is selected a connection will be set up via login and password to a connected SharePoint account. In this case, the credentials are stored and protected in the Integration Hub app. Login to the PWA and please make sure that the account used for running integrations has the necessary set of permissions.
Please note: The Project Server you add as a URL in the login field should be within the same domain as the virtual machine where Integration Hub on-premises is installed.

4. Create the required enterprise custom fields for your PWA. This can be done by clicking Create field button next to each field under the Parameters section.
5. To make sure that all the custom fields are configured as expected, click Verify configuration button.
6. The Include Project Name and Task WBS to Plan Name allows automatic naming of Planner plans. The plan name will consist of PO Project name, WBS, and task name.
Example: For the task named Development phase, which WBS is 3.2, in a project named Apollo the plan created will be named Apollo 3.2: Development phase.
If you leave this checkbox unmarked, the plan name will include WBS and task name only (e.g. 3.2: Development phase).
Please note: Master Projects are not supported for integrations.
7. Click Next.
8. In the Planner App Details section, choose an existing Planner connection or add a new one by clicking New and entering credentials requested.

9. Click Next. The Mapping wizard page shows the default integration fields mapping. In this scenario there are no configurable options. Click Next again.
10. The Schedule screen allows configuring the integration schedule. There are two options available:
- On demand - means that the integration scenario will be started only manually by clicking on the Run Now button in the scenario list.
- By schedule - means that integration will be started automatically according to the configured rule daily or weekly.
The Synchronization Start Date option is not used in this scenario, we recommend skipping it.
11. Click Done to save your integration scenario. You will be redirected to the Scenarios page.
Please note: This wizard creates two integration scenarios for both sync directions (Project Online > Planner and vice versa).
You have successfully configured the integration scenario! The next step will be to configure your PWA following the steps described in the Configure Project Online article.

