
Data Management section in DataMart allows performing the following operations:
1. Add new data connection.
2. Edit your data connection information.
3. Perform Data Synchronization:
- Setup Data Synchronization Schedule;
- Trigger synchronization manually;
- Update Synchronization Account.
4. Set one or multiple SharePoint groups for DataMart Administrators Groups, Authors Groups and Viewers Groups.
5. Delete data connections.
Data Connections
Data connections in DataMart can be added for Project Online, Project Server 2013 or 2016, and Planner.
Please note: DataMart supports the former version of Microsoft Planner and the new Planner (basic plans). This includes all basic templates:
- Simple Plan
- Project Management Basic (without a diamond)
- Business Plan Basic (without a diamond)
- Employee Onboarding Basic (without a diamond)
Adding Project Online connection
Follow the steps below to add a Project Online connection:
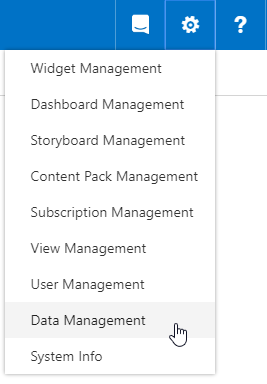
1. Navigate to your DataMart site.
2. Click the gear button and select Data Management.
Please note: If no connections are added so far, you will be redirected to Data Management automatically.
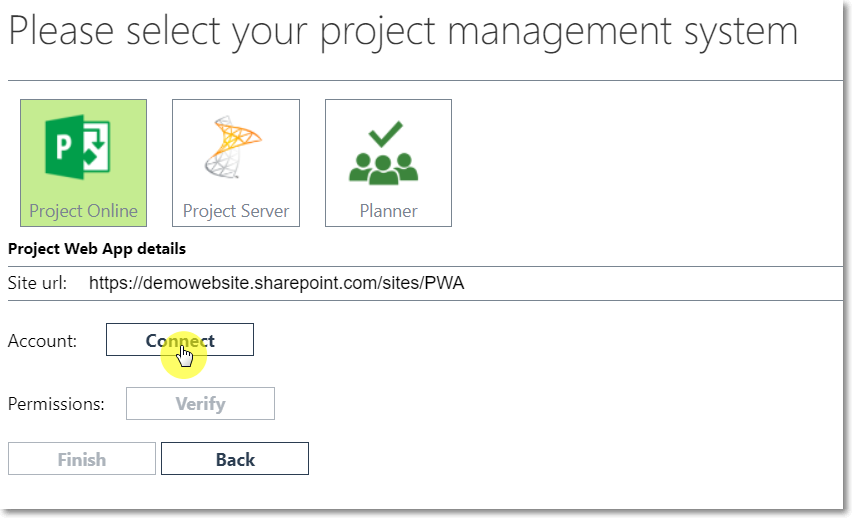
3. Click on the Project Online icon.

4. Specify the PWA Site URL.
If you are using DataMart Cloud, before you proceed, tenant Global Administrator (or Application Administrator) consent is required to allow EPM Pulse to access your Microsoft 365 tenant. Admin consent should be granted only once; after this, any user account credentials without admin permissions can be used to add/refresh the Project Online connection.
Ask your Azure Global Administrator or Azure Application Administrator to grant consent for the EPM Pulse enterprise app.
For this, please copy the following URL for granting tenant-wide admin consent:
https://login.microsoftonline.com/common/adminconsent?client_id=b2497771-1994-4499-8209-dd5693b9af3a
For more details, please refer to this article.
5. Click Connect button next to 'Account'.
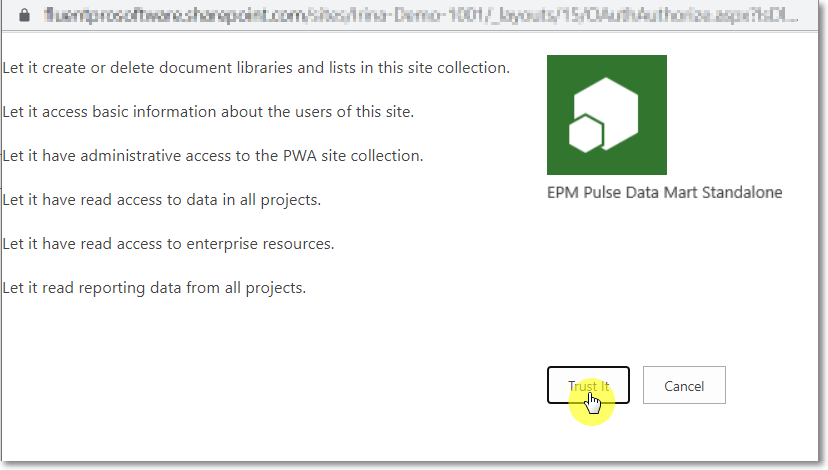
6. The 'Do you trust EPM Pulse?' window will appear. Click Trust It button, if you agree with all the permissions (if you are not currently logged in to the PWA that you are adding you will be asked to log in first).
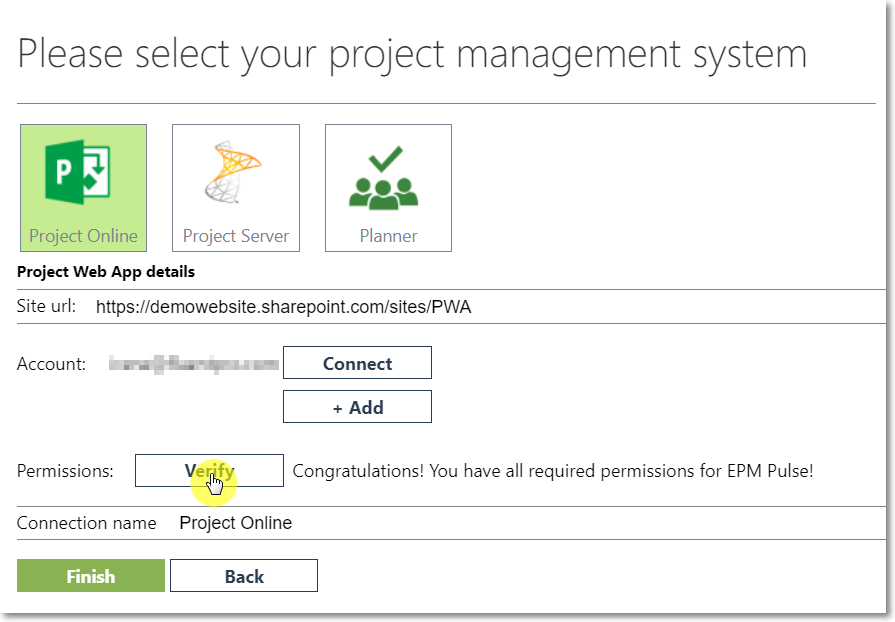
7. Click Verify button to check if you have all required permissions for DataMart.
8. Click Finish and the connection to your Project Online PWA will now appear in DataMart.
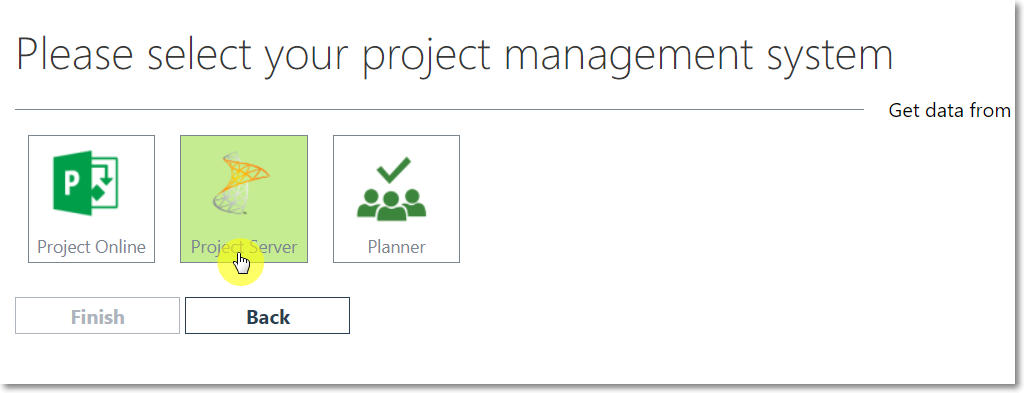
Adding Project Server 2013 or 2016 connection
In case DataMart is newly installed before adding a connection a tenant should be created. Refer to this article for details on how to add a tenant.
1. Go to https://datamart.domain.com/@companytenant where datamart.domain.com – IIS host domain name.
2. Navigate to Data Management.
Please note: In case you do not have any connections yet, you will be redirected to Data Management automatically.
3. Click on the Project Server icon.
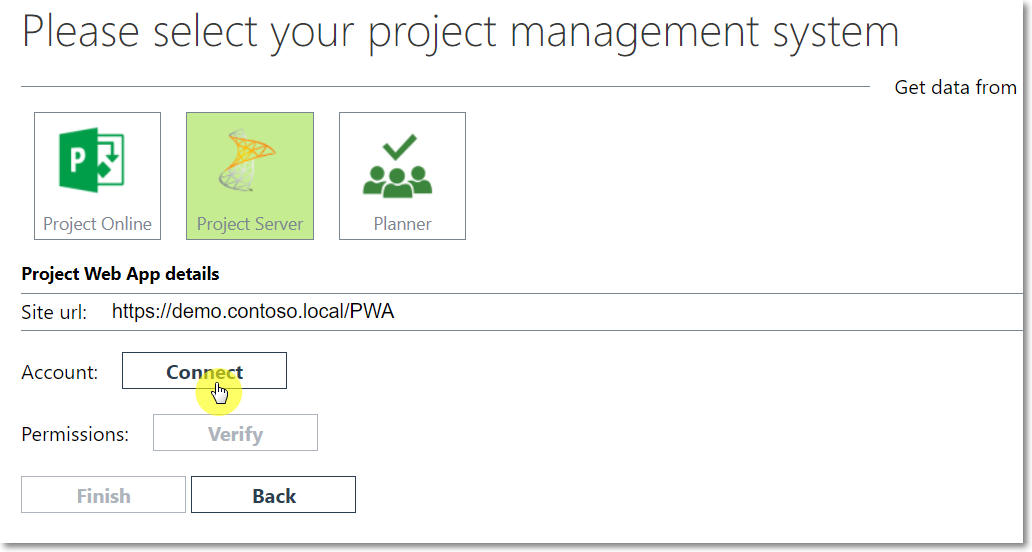
4. Specify the PWA Site URL and click Connect next to 'Account'.
5. The following pop-up window will appear:

6. In the SP Sync Account Login field specify the Project Server 2013/2016 instance access account name.
Please note: The instance access account should be a Site Collection Administrator and should be assigned to the Administrators for the Project Web App SharePoint group or similar. More detailed information about SP Sync Account requirements you can find in the Update Synchronization Account article.
7. In the SP Sync Account Password field enter a password for the Project Server 2013/2016 Instance access.
8. In the DB Connection field type the following:
Data source=demo.contoso.local;Initial catalog=ProjectWebApp, where
- demo.contoso.local is a server name where PWA DataBase resides
- ProjectWebApp is a ProjectWebApp Database name.
9. Check the Use SQL Authentication checkbox to use the SQL Authentication for the ProjectWebApp Database.
Please note: If you do not want to use the SQL Authentication to the ProjectWebApp DataBase then uncheck the Use SQL Authentication’ checkbox. In this case, the account used as both App Pool Account and Service Account should have reader access to the ProjectWebApp database of your PWA instance.
10. In the Login field enter the SQL Server account name.
Please note: Any account that has reader access to the ProjectWebApp database can be used as an SQL Server account.
11. In the Password field enter the password of the SQL Server account.

12. Click Submit button.
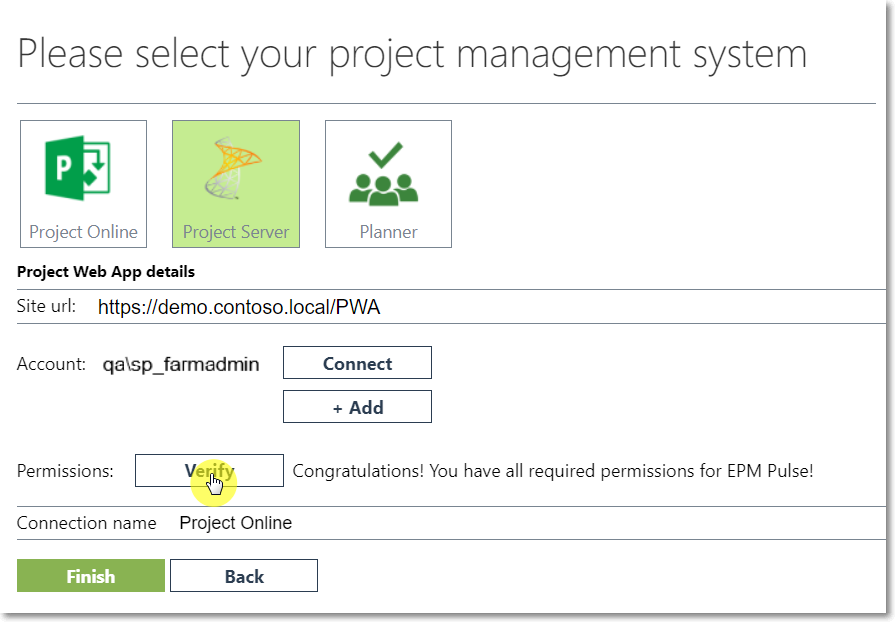
13. Click Verify button in the Project Web App details section to see if you have all the required permissions for DataMart.
14. Click Finish to add this connection to DataMart.
Adding another data connection
You can add another connection if needed.
Please note: The number of data connections depends on your license.
If Data Mart is activated in trial mode, you will be able to add as many data connections as you need.
After you purchase a license, the number of data connections that you are able to add will depend on your license. If you add more Data Connections than your license allows, you will be able to use only those first data connections that were added according to your license. It is possible to change data connections by deleting the old ones and adding the new ones if needed.
To add one more connection to your DataMart select the Add new data connection option.

Add a new connection the same way you have added the first connection.
Editing Data Connection
The data connection information can be updated if needed. To perform the changes click the Manage button.
Please note: The settings marked in blue are only available to users with EPM Pulse Global Administrator permission.
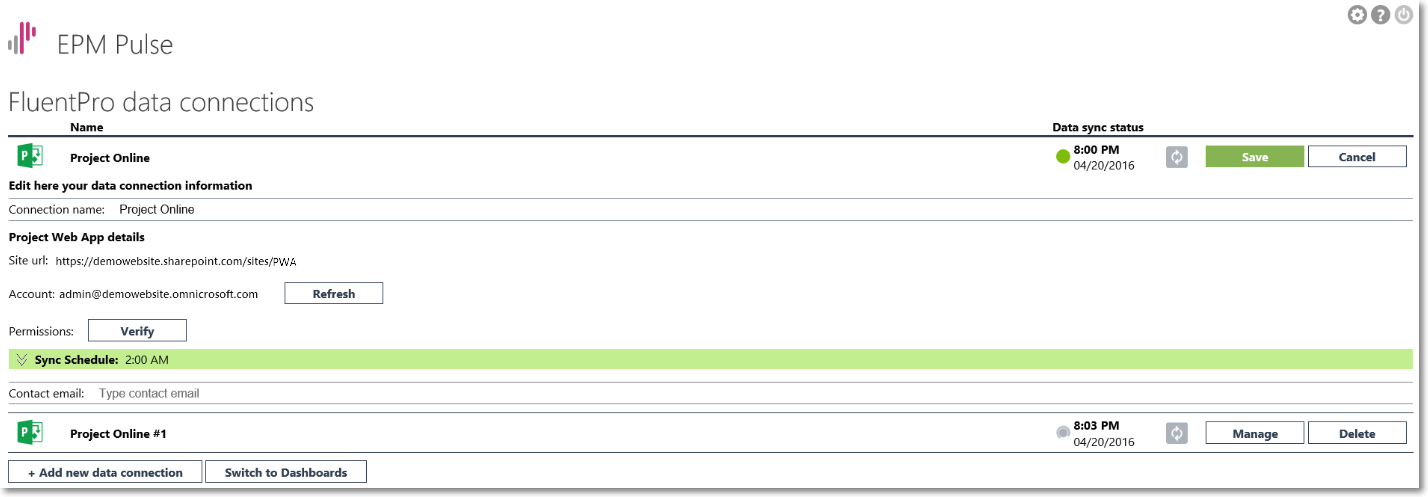
The changes listed below may be performed here. Follow the links for more detailed information on each change:
1. The name of the data connection.

2. Refresh the synchronization account.
3. Enable 'Audit Manager for Project Server' if the corresponding license was purchased - https://fluentpro.supporthero.io/container/show/audit-manager
4. Verify the sync account permissions.
5. Enable or disable the Use PWA data access permissions option.
6. Manage SharePoint groups which will be used to synchronize users from your PWA to DataMart.
7. Provide the names of SharePoint Lists, which need to synced to DataMart.
10. Enable or disable the Perpetual data synchronization from PWA to DataMart.
11. Adjust the sync schedule.
12. Adjust the Snapshot schedule.
13. Change contact e-mail, which is used for receiving important notifications about DataMart performance - sync job failures, etc.

Deleting data connection
You can delete data connections if needed. To do this:
Go to Data Management.
Click the Delete button.

Confirm deleting the reports in the confirmation pop-up window.