
This guide describes how to update the FluentPro Integration Hub to a newer version.
Before you start the update process, please make sure you have all the required prerequisites.
All Integration Hub services in Windows Services must be stopped before installing the new version.
You must uninstall the previous version of Integration Hub from the Windows Control Panel ('Unistall Program' section).
If you install the new version of Integration Hub to the same directory where the previous version was installed (if you do not change the names of the databases in the configurator), the configuration that you provided when installing Integration Hub for the first time will be preserved.
1. FluentPro Team will provide you with an installation file for downloading and update of Integration Hub On-Premises.
2. Select the installation file (the file will be provided in the following format: Integration Hub.{BuildNumber}.msi) and run it.
3. On the Welcome to the Integration Hub Setup Wizard screen click Next.

4. On the License Agreement screen read a standard FluentPro Software as a Service Subscription Agreement, select the “I agree” option, and click Next to proceed.

5. On the Select Installation Folder screen click Next to install Integration Hub to the default folder, or if you want to install it to a different folder, provide the path to this folder and click Next.

6. On the Application Nodes Selection screens check the check-boxes for the connectors you want to install for your Integration Hub instance and click Next.
There will be three screens in a row with a list of currently available connectors.
Check the checkbox “Web Interface” to create a website for Integration Hub. You can find this website in Internet Information Services Manager after installation is completed.
A separate service will be installed for each selected connector. Сheck that the services are running after the installation process is finished, and if they are stopped, start them manually.
Application Nodes Selection Screen 1:

Application Nodes Selection Screen 2:

Application Nodes Selection Screen 3:

7. On the Confirm Installation screen click Next to start the installation process of Integration Hub on your computer.

8. On the FluentPro Integration Hub Configuration screen License Details section provide Company Name, Contact Name, and Contact Email details. These contact details will be used for your license.

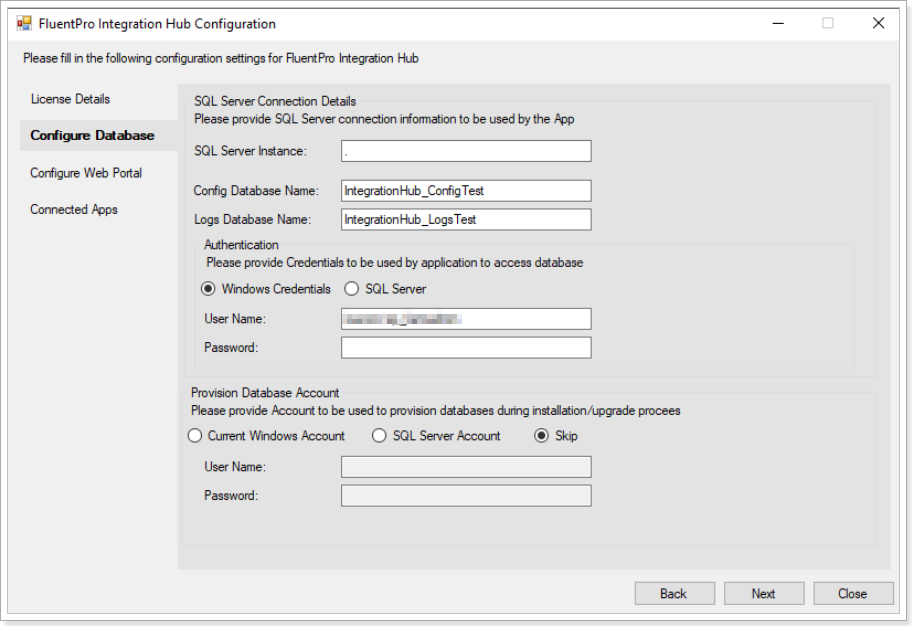
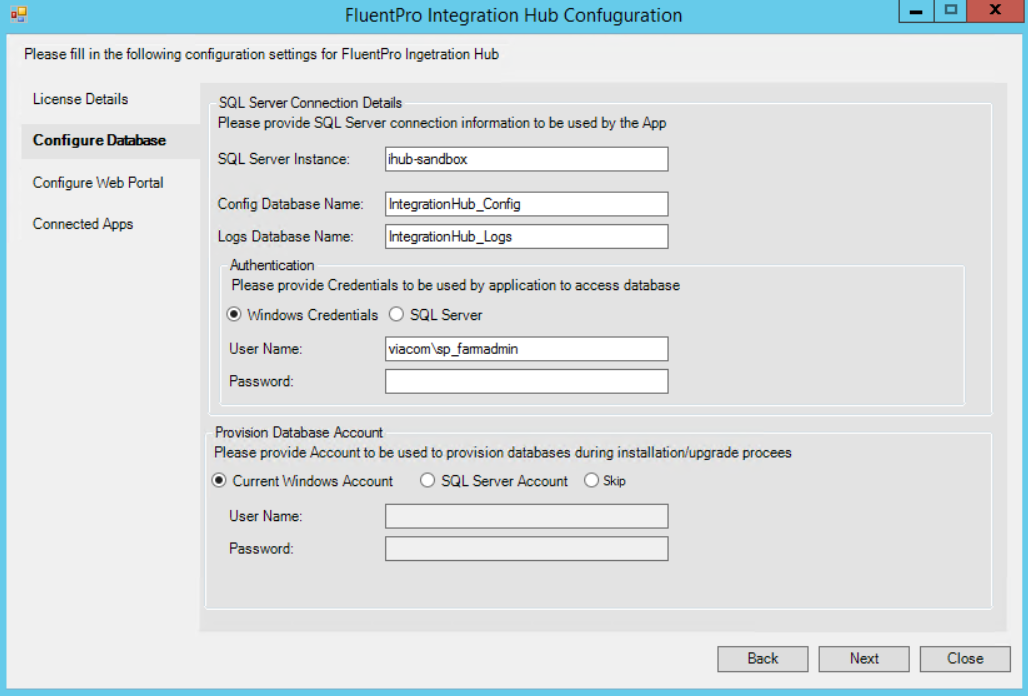
9. On the FluentPro Integration Hub Configuration screen Configure Database section provide configuration settings.
- In the SQL Server Connection Details section enter SQL Server Instance.
- In the Authentication section сhoose authentication mode and enter valid credentials.
Please note: by default, SQL Server Instance is set to local.
Config Database Name and Logs Database Name are defined automatically, please do not alter them. These databases are required for Integration Hub to work correctly.
There are two authentication modes available:
- Windows Credentials
- SQL Server
Please note: If you select SQL Server, make sure that Mixed mode is turned on in SQL Server.
The credentials specified will be stored in a customer’s AD database (for Windows Credentials option) or SQL database (SQL Server option). These credentials will be used by the Integration Hub application to access a database.
- In the Provision Database Account section provide account details that will be used to provision new databases during the installation/upgrade process.
There are two account options available:
- Current Windows Account
- SQL Server Account.
Please note: If you are installing Integration Hub for the first time and need to provision databases with Windows Credentials, it is required to choose the "Skip" option to skip the database provisioning step. It is required due to the way Microsoft Installer handles user account pass through to the child processes.
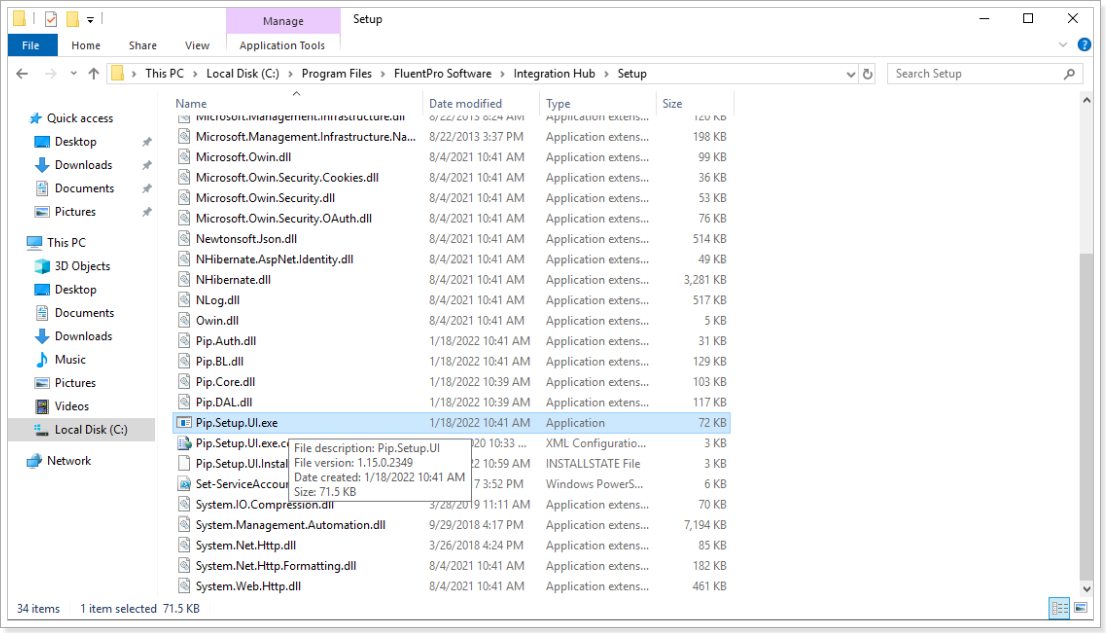
When the installation is completed, it is required to manually launch the Integration Hub Configuration Tool, located at <Program files => FluentPro Software => Integration Hub => Setup => Pip.Setup.UI.exe file. Select to connect with the correct Windows User (Shift-Right-Click --> Run as Different User) and select the "Current Windows Credentials" in the Provision Database Account section of the configurator (all other options except for passwords will be filled in already in the configurator).
Please note: If you select Current Windows Account, the account under which the installation runs will be used and provided with admin privileges.
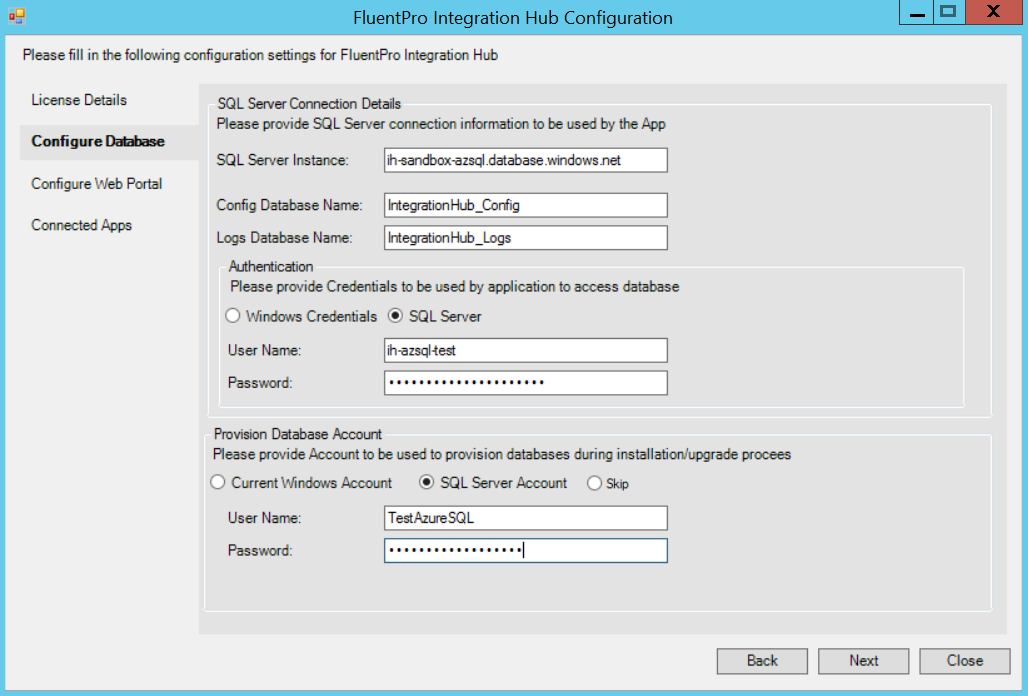
Please note: Integration Hub is also compatible with Azure SQL Server.
In this case, there is only one authentication mode available: SQL Server.
The credentials specified will be stored in a customer’s Azure SQL database. These credentials will be used by the Integration Hub application to access a database.
In the Provision Database Account section select 'SQL Server Account' and provide account details that will be used to provision new databases during the installation/upgrade process.
Please note: If you already have Integration Hub configured and need to change the On-premises SQL Server to Azure SQL Server, please follow the steps described in the 'How to switch from an existing Integration Hub instance to Azure SQL' article.
10. On the FluentPro Integration Hub Configurationscreen Configure Web Portal section the configuration settings for a Web Site are set up.
In the field Web Address an internal address is set by default. If you would like to specify an external address, please provide a valid SSL certificate.
In the section Portal Administrator Credentials specify an account (basic authentication) that will have Global Administrator permissions to the application and under which you will be able to log in to the application afterward. The credentials can be further updated in the application interface if required.
In the section SMTP settings SMTP should be configured to enable Integration Hub to send notifications about job fails, etc. In the field E-Mail address provide an address that will be used as a sender address.

11. On the FluentPro Integration Hub Configuration screen Connected Apps section the details of the Project Online App that will be connected to Integration Hub should be configured.
- Enter SharePoint Online tenant name instead of “your-company-tenant” text and click Navigate link. By following the link, register the Project Online app following the instruction below (at the end of this article).
- Enter “Client Id”, “Client Secret” and “Redirect URL” which are obtained during the registration of the application.
- Set “App domain (Host Name)” field to the IIS site host domain name.

- Click Save to proceed.
12. The Finish screen will display the configuration summary. Click Finish to exit the configuration wizard.
13. After the installation process finishes the required services, site and databases will be created and proper settings will be set up. To perform a post-installation verification navigate to Services and verify that related processors and services were started. In case they are not running, please start them manually.
14. Open Internet Information Services (IIS) Manager and under Sites choose Integration Hub site that you have configured. In the Browse Website section click on the link to navigate to the application website. Enter the account credentials that you have specified in the section Portal Administrator Credentials to log in to the application.
15. You can start using the application and configure the integration scenarios required. Please refer to the following section in our Help Portal to find more information on how to use Integration Hub and set up integration scenarios.
Online app registration
Please note: An Office365 account with Site Collection Administrator of root site collection permissions is required for Online App registration
1. Go to https://yourtenant.sharepoint.com/sites/pwa/_layouts/15/appregnew.aspx where:
- yourtenant – name of SharePoint Online tenant;
-
pwa – name of Project Online Instance.

2. Click Generate for ‘Client Id’ and ‘Client Secret’. Copy and save ‘Client Id’ and ‘Client Secret’, they will be required in the Configure Apps section during the installation process.
3. Enter any ‘Title’ for your app.
4. Set the ‘App domain’ field to the IIS site host domain name. This will be required in the Configure Apps section during the installation process.
5. Set ‘Redirect URI’ field to https://demo.fluentprohub.com/ConnectionProviders/ProjectOnline/AcceptAccessToken where demo.fluentprohub.com – IIS host domain name.
6. Verify that all fields contain proper information and click Create.