
In this article, we will review the migration steps of the Project Online -> Planner Premium (formerly Project for the web) migration scenario.
Please note: All information in this article also applies to the Project Online -> Dynamics Project Operations migration scenario.
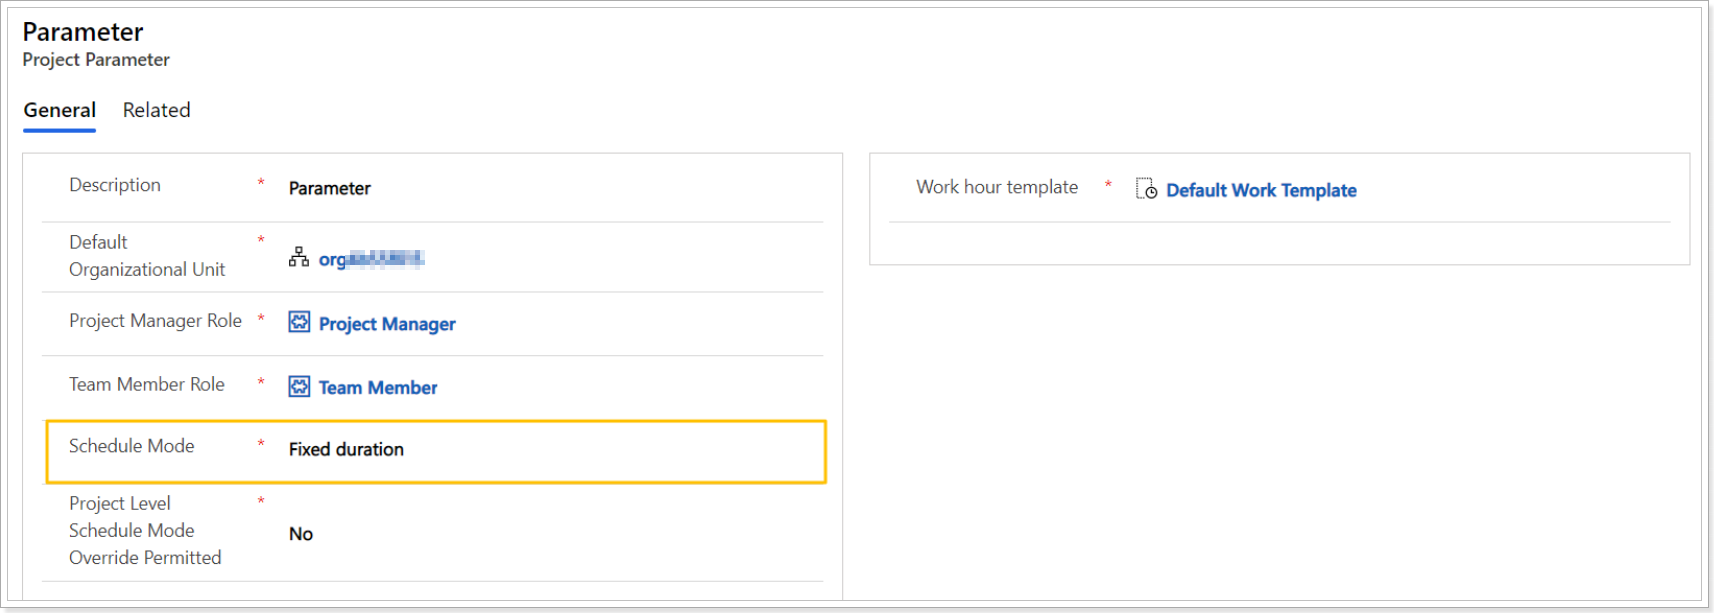
Please note: For data to be migrated correctly from Project Online to Planner Premium, it is required to set a fixed duration schedule type for the Planner Premium environment. Although this setting is not available in the user interface, it can be configured through the Power Platform (Power Apps) environment settings. By default, Planner Premium uses a Fixed Duration scheduling model, but if a different calculation type is set at the environment level, it may affect how task data is migrated.
For this, perform the following before starting the migration process:
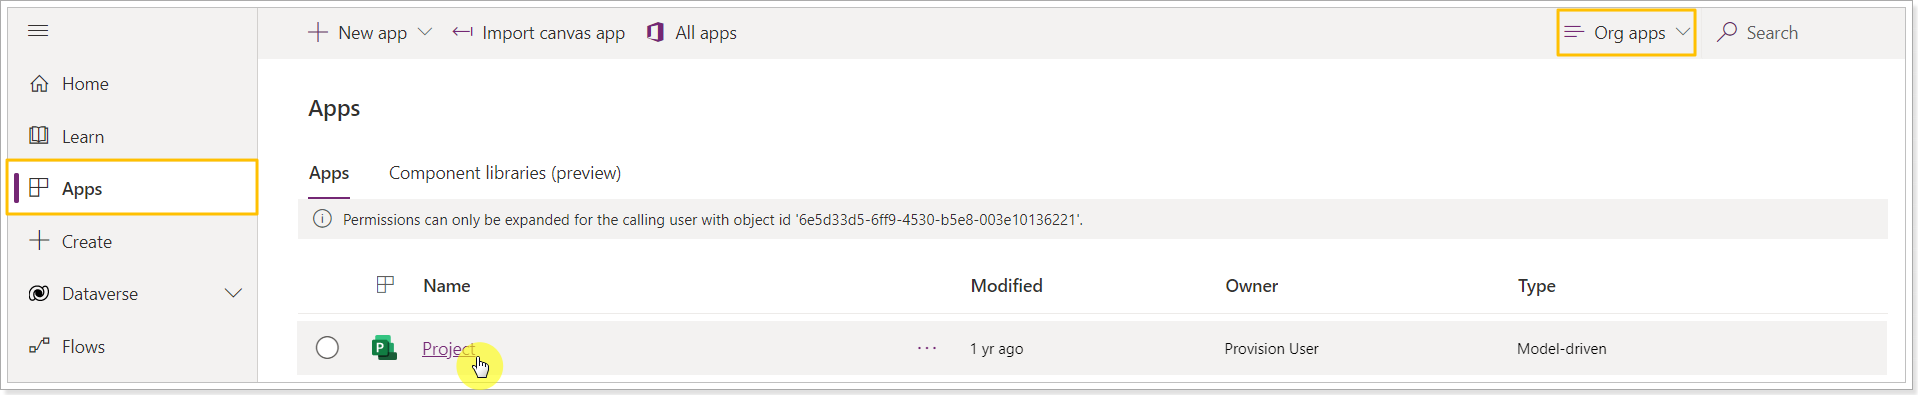
1. Log in to Office 365, open a browser window, and go to https://make.powerapps.com.
2. On the PowerApps page, select Apps => Org Apps => Project.
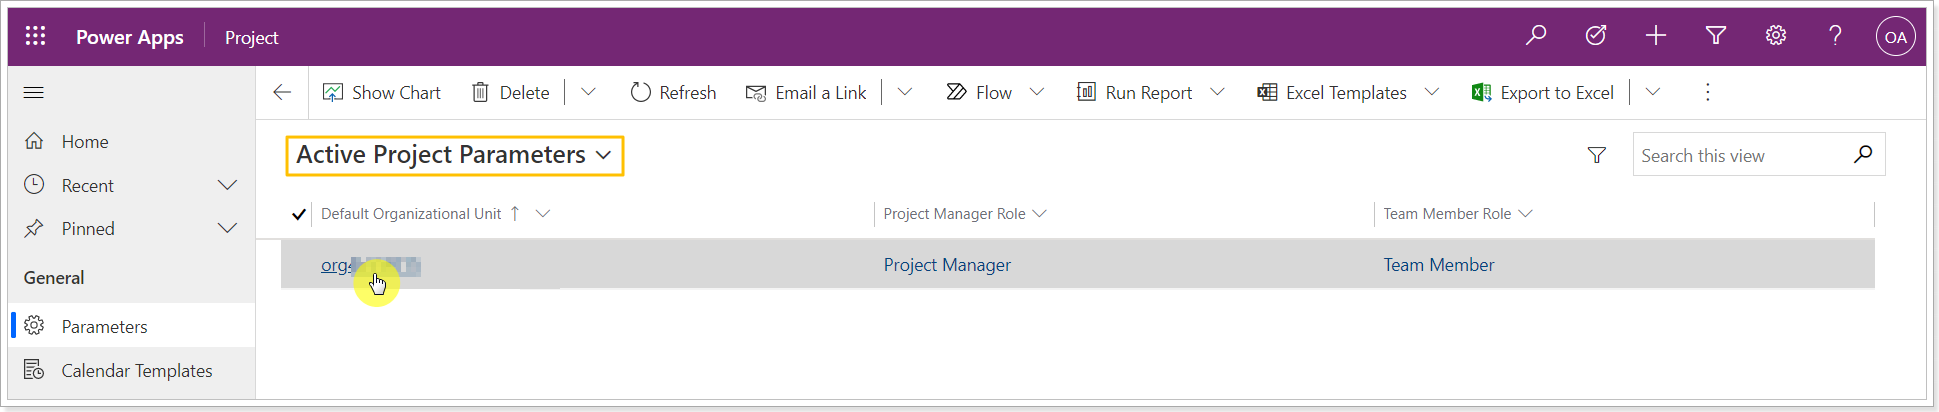
3. On the Project page, in the left pane, select Settings.

4. Under Active Project Parameters, click on the Org Unit.
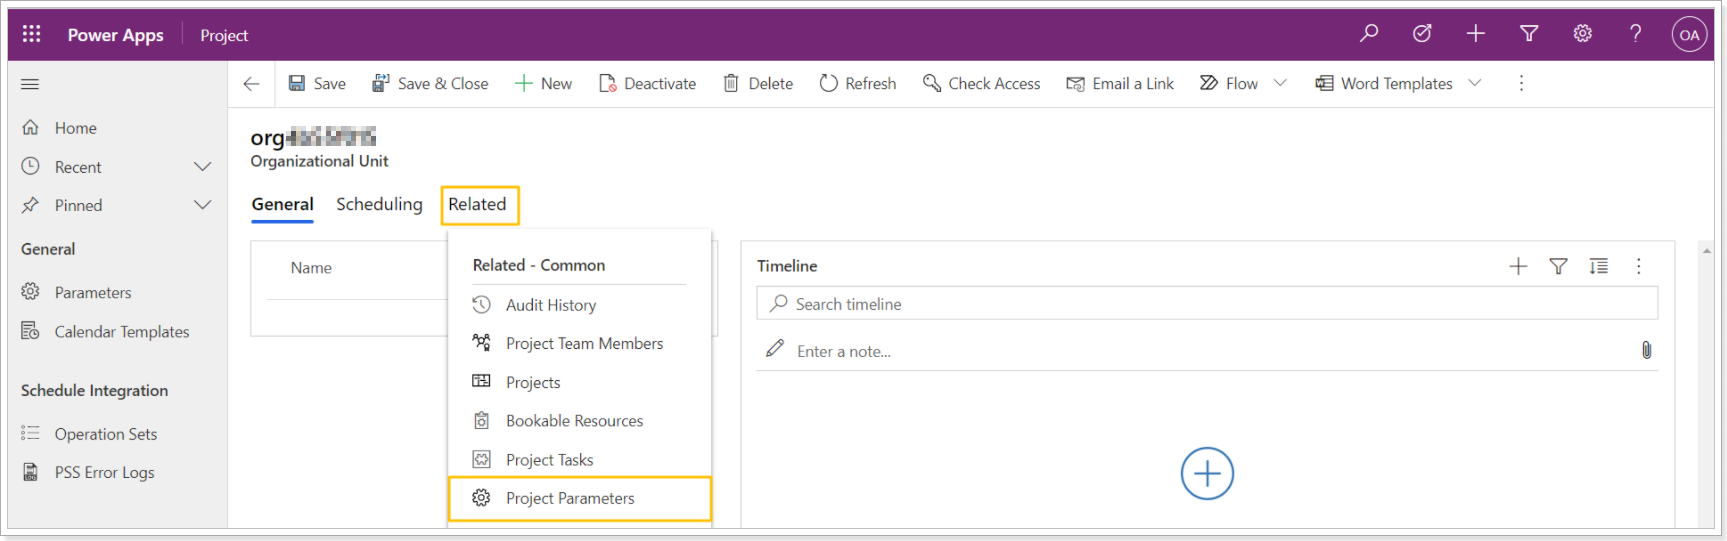
5. Click on the Related tab => Project Parameters.
6. Click on Parameter => Schedule Mode and set Fixed duration.
To launch the migration from Project Online to Planner Premium, you will need to take several steps:
Step 1: Connect to source and target systems
To start the migration process, perform the following:
1. Open the Project Migrator home page and select the Project Online -> Planner Premium scenario from the list of available scenarios. Alternatively, click on the Start New Migration button.

2. Click the Connect button to connect to Project Online.

3. Provide your PWA URL and select the authentication type: Basic or OAuth.
If you select the Basic authentication type provide your credentials for the PWA and click Connect. If requested, grant Project Migrator the permissions required.

OAuth authentication type is also available. If you have multi-factor authentication enabled (or any other custom authentication), please select the OAuth authentication type.
Please note: The account used to register the Project Migrator app should have at least a Cloud Application Administrator permission (as the app is registered on the tenant level).
For detailed information about the account permissions please refer to the Connection account requirements article.
1. Copy the Redirect URL value from the Project Migrator Create Connection window.

2. Go to the website:
https://portal.azure.com/#blade/Microsoft_AAD_RegisteredApps/ApplicationsListBlade
3. Click the 'New Registration' button.
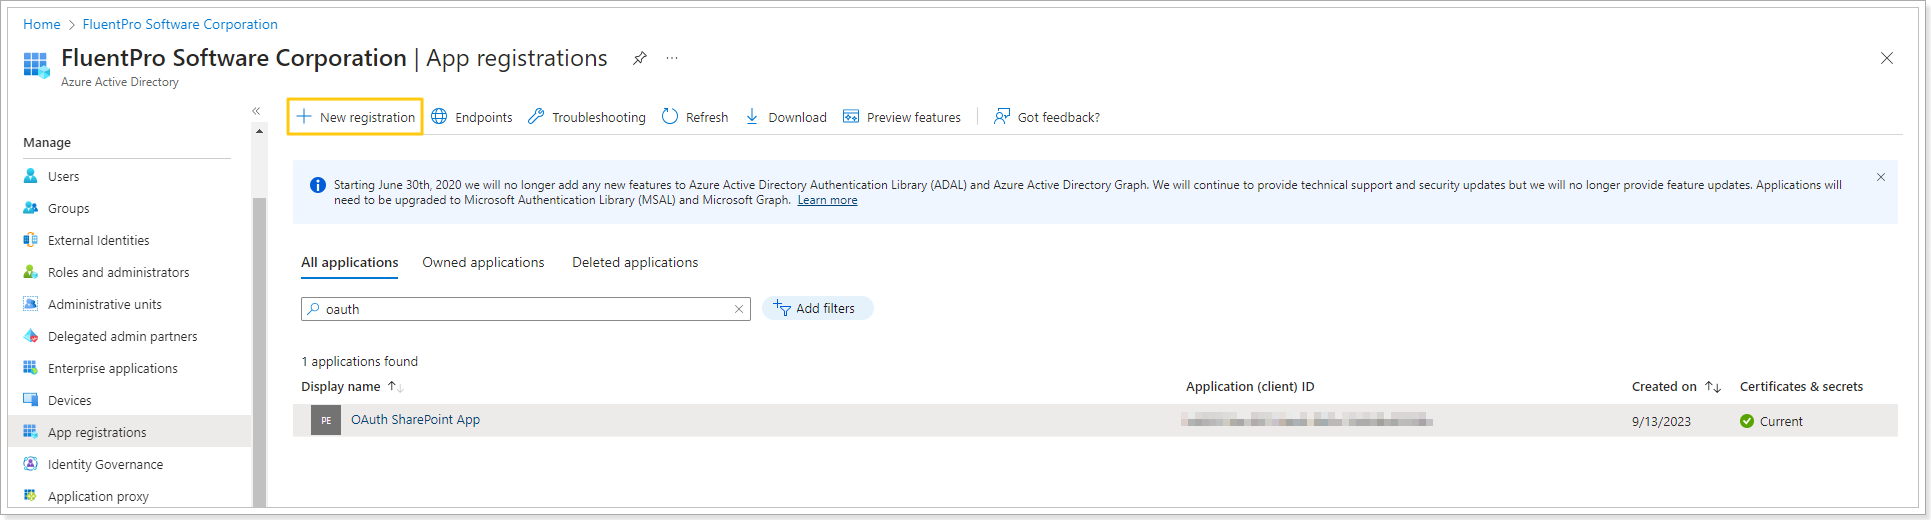
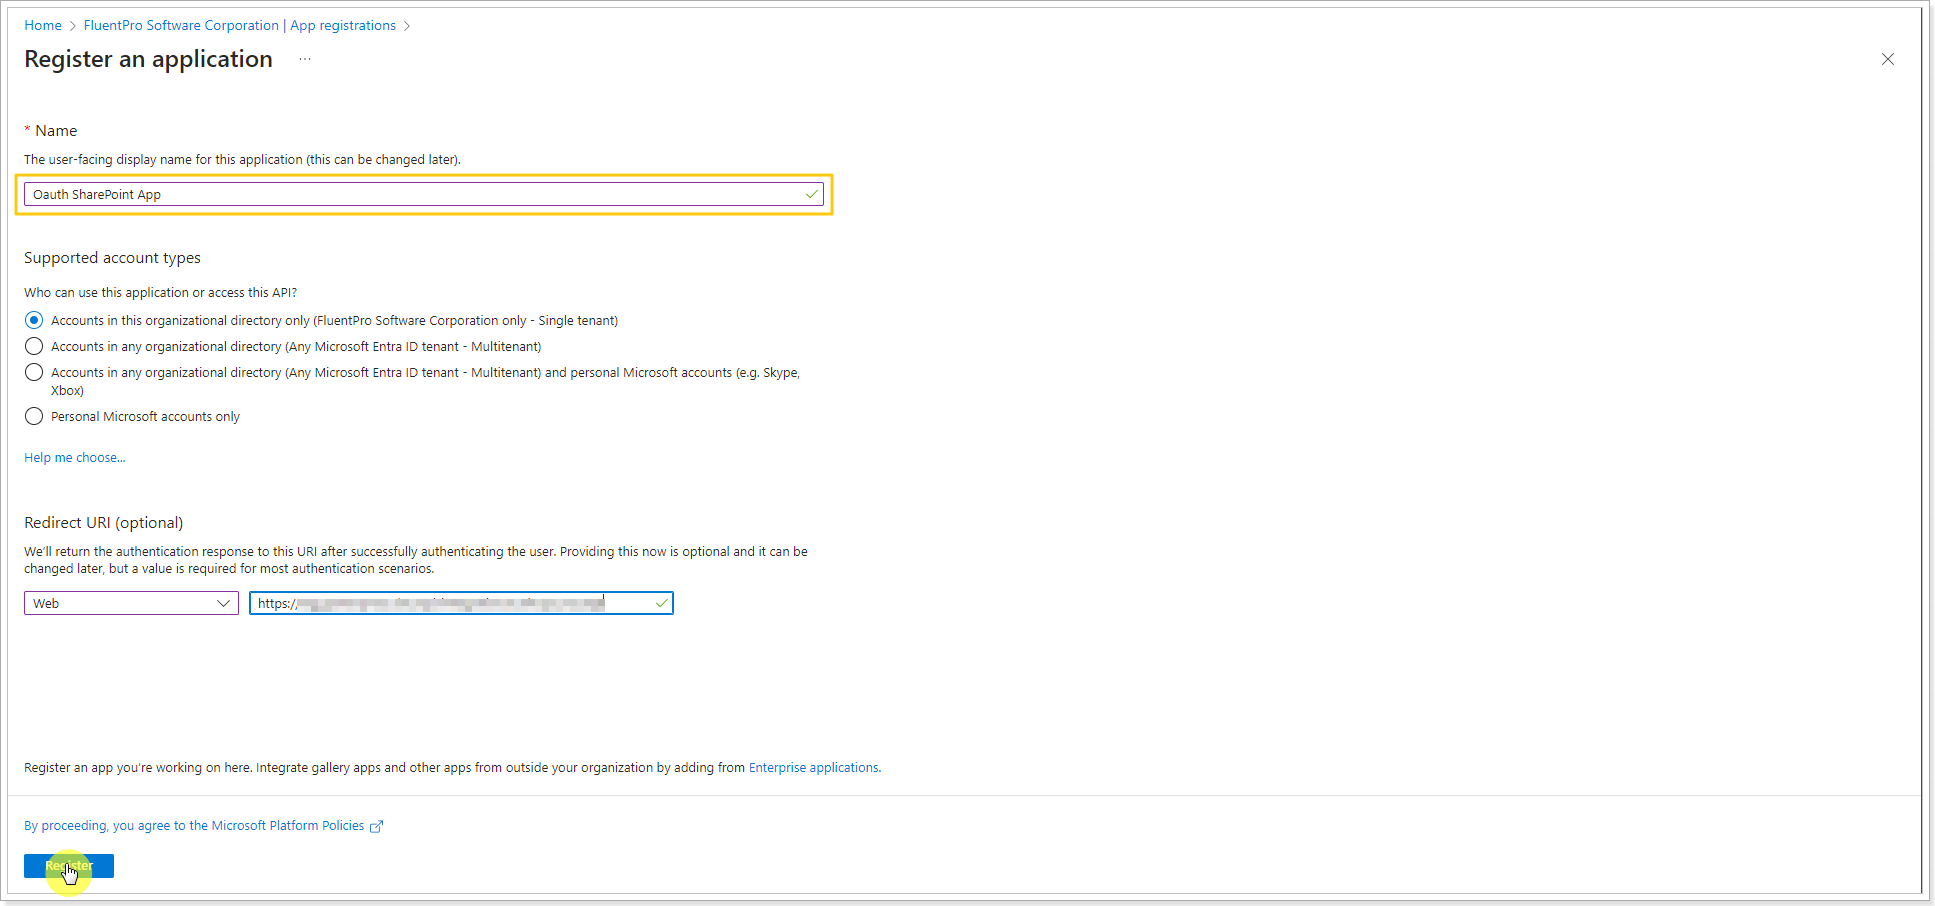
Type in any name for your new app (e.i. 'Project Migrator OAuth SharePoint App') and paste the Redirect URL from the Project Migrator Create Connection window. Then click 'Register'.
4. Copy the Application ID value.
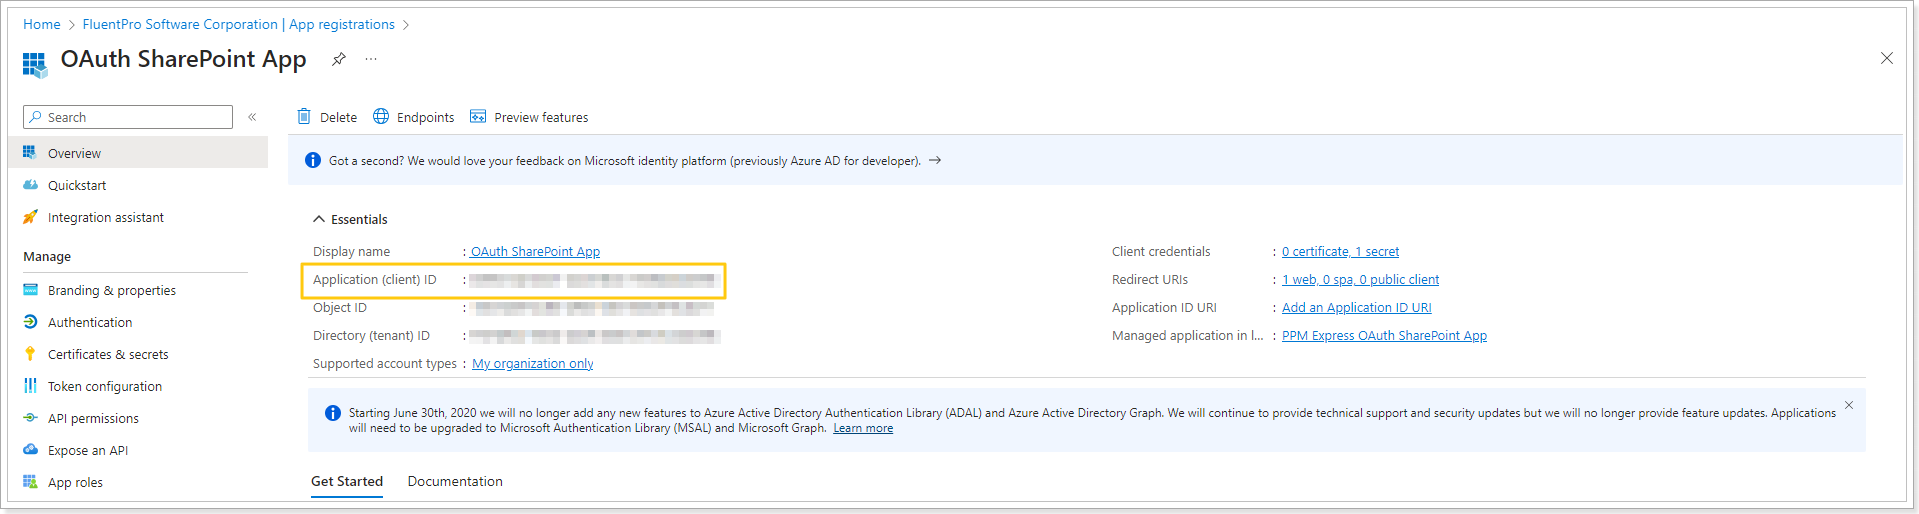
5. Paste it to the Project Migrator Create Connection window => Client ID field.

6. Open the App Registrations page again and click on the 'Certificates and Secrets' option on the left.
Click the 'New Client Secret' button.
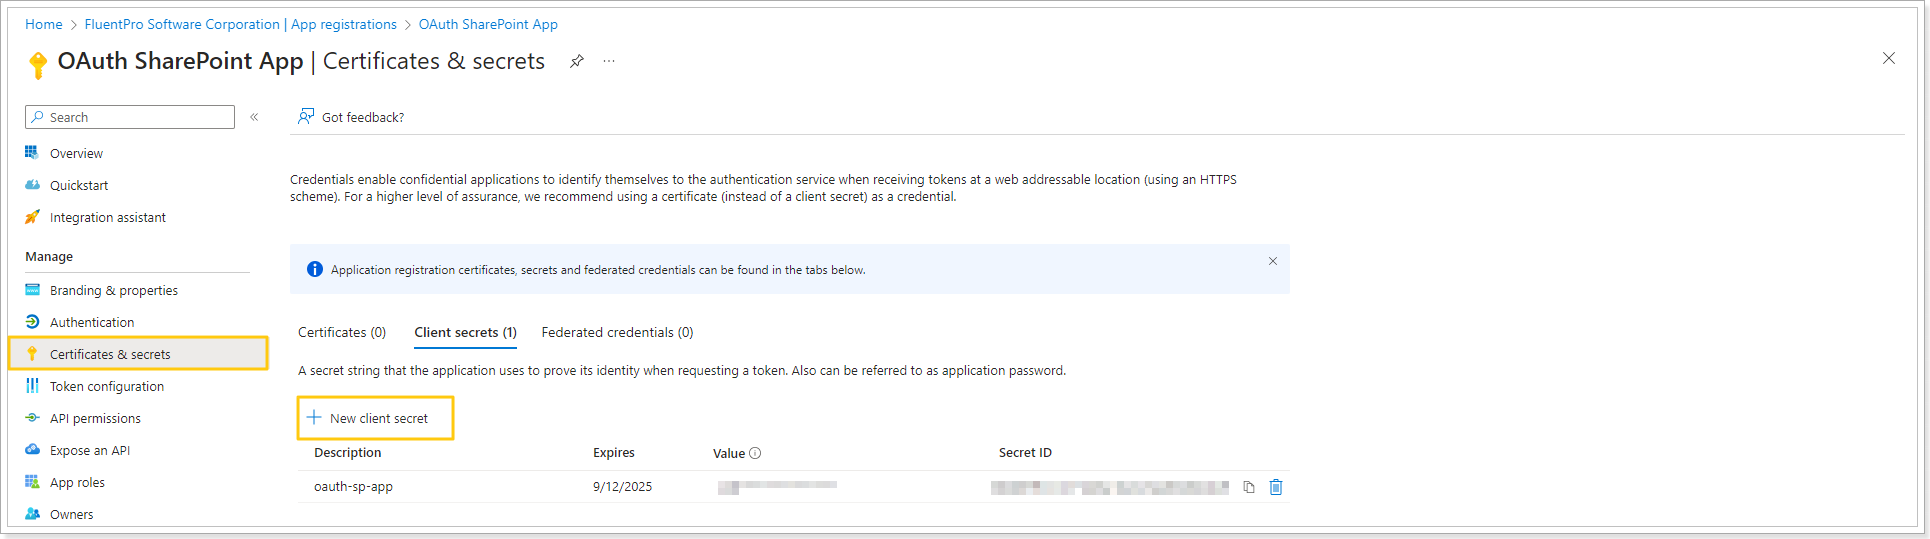
7. Choose any name (e.i. 'Project Migrator') and the expiration date for your secret.
Please note: You will need to repeat these steps once the secret expires.
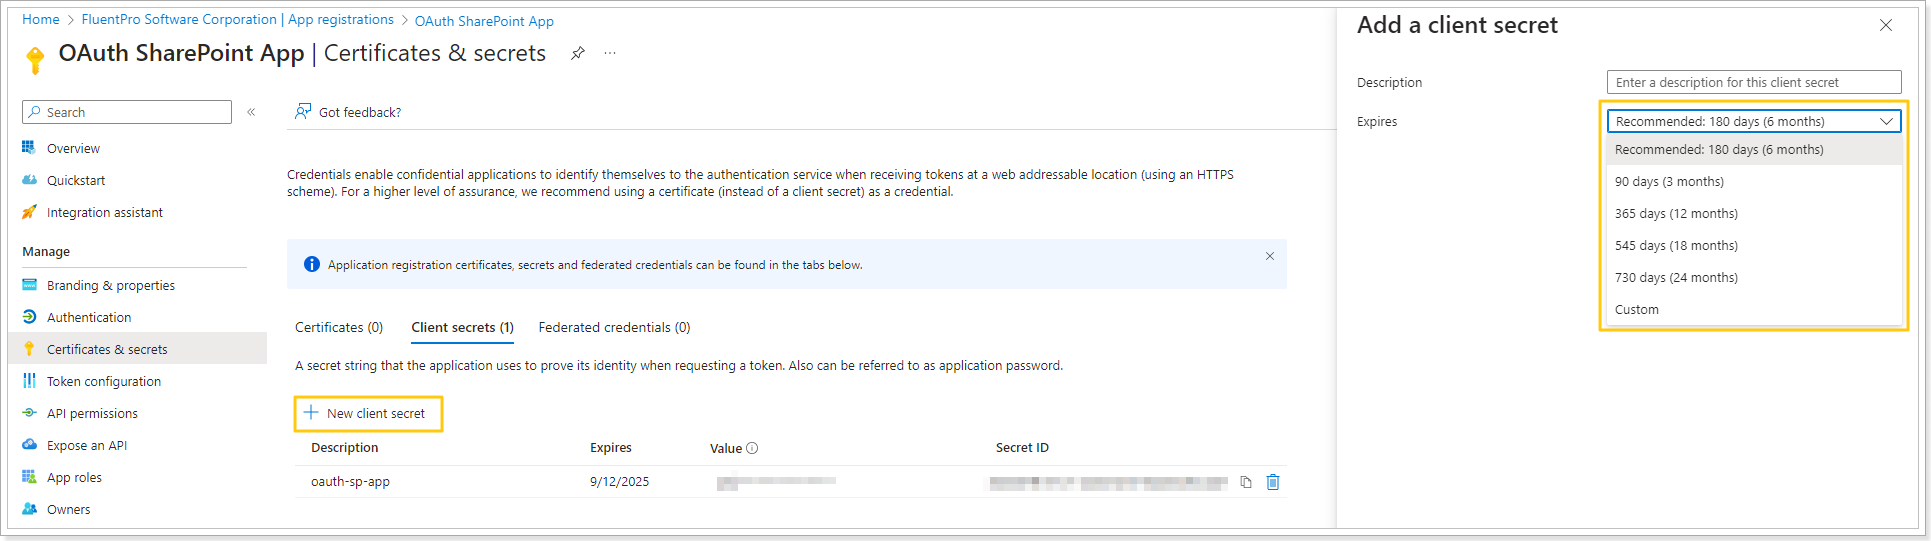
8. Copy the Value of your new 'Client secret'.
Paste it into the Project Migrator => Client Secret field.

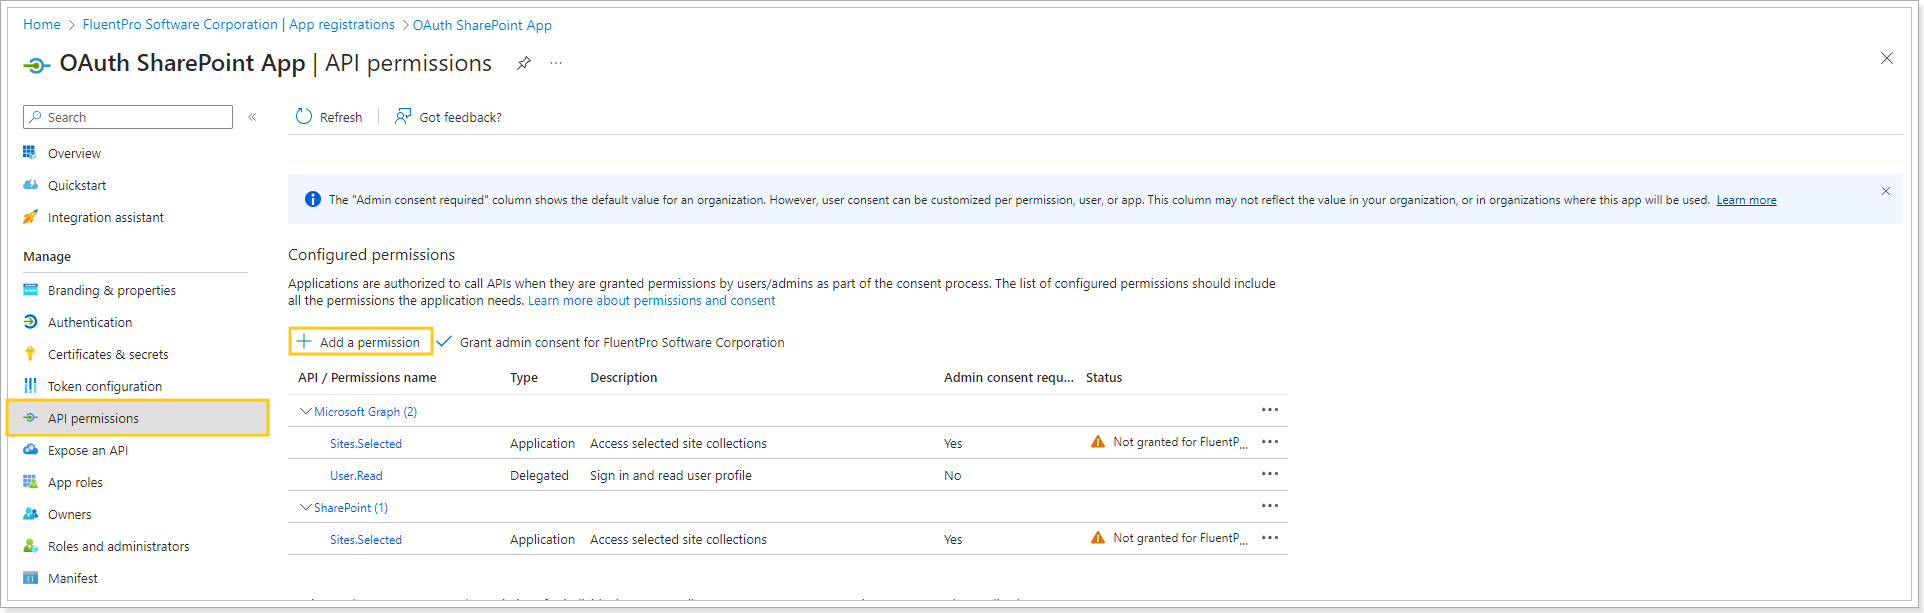
9. On the App Registrations page, click the 'API Permissions' button and add the following permissions:
- Sites.Selected (Microsoft Graph)
- User.Read (Microsoft Graph)
- Sites.Selected (SharePoint)
10. Open Project Migrator again and in the 'Create Connection' window click Connect to proceed.

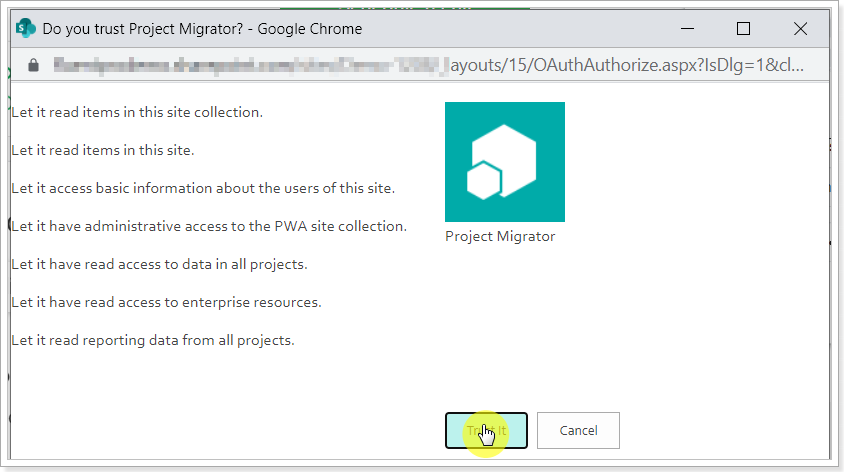
11. Sign in to your Office 365 account.
In the window that appears click the Trust it button.
12. Next, connect to the Planner Premium environment.
Click the Connect button to connect to your Planner Premium account.

In the opened window, the environment field, provide the URL of your Power Platform Environment where the Planner Premium is deployed. Please refer to the 'How to find the Environment URL for Planner Premium' article for detailed instructions on how to find the required URL.
13. Click Connect.

Log in to Planner Premium using an Office 365 account that meets the connection requirements.
Project migrator allows creating task custom fields in Planner Premium when migrating data from Project Online to Planner Premium. To use this functionality, it is required to generate a token when connecting to your Planner Premium environment.
Click on the "I would like to migrate Task Custom Fields" checkbox.

Click on the "Planner (premium plans) Token Generator" to download the file.

Once downloaded, open the file and click Connect. Sign in with your Planner Premium account.

Copy the generated token.

Paste the token into the Project Migrator "Task Custom Fields Token" field and click Proceed.

Please refer to the 'How to create task custom fields' article for more details.
If you do not plan to create custom fields, leave the "I would like to migrate Task Custom Fields" checkbox empty and click Proceed.
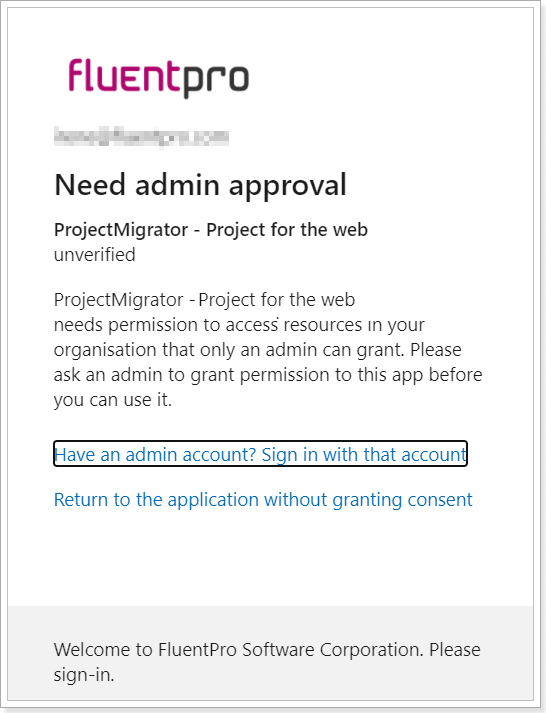
If you connect to Planner Premium for the first time, Global Administrator consent is required.
Before adding a connection for the first time, the Office 365 tenant Global Administrator consent (Admin Consent) is required to grant the Project Migrator app permissions to access Office 365. Admin Consent should be granted to Project Migrator only once. When consent is granted by Global Admin, any other account that meets the requirements can be used to add more connections within the same Office 365 tenant.

If you use an account that does not have Administrator permissions to add a Planner Premium connection for the first time, the 'Need Admin Approval' window will be opened instead. The 'Need Admin Approval' window may be opened after the login attempt. This window appears in case it is not allowed by your organization for users to add apps to the Office 365 tenant without admin approval.
In this case, contact your Office 365 Global Administrator to grant admin consent.
When the credentials are added once, they are encrypted and stored for your convenience after launching the migration. The next time you need to launch the migration process, you can select from the list of credentials that you have added previously.
If you need to change the account you have provided, click on the Change button.

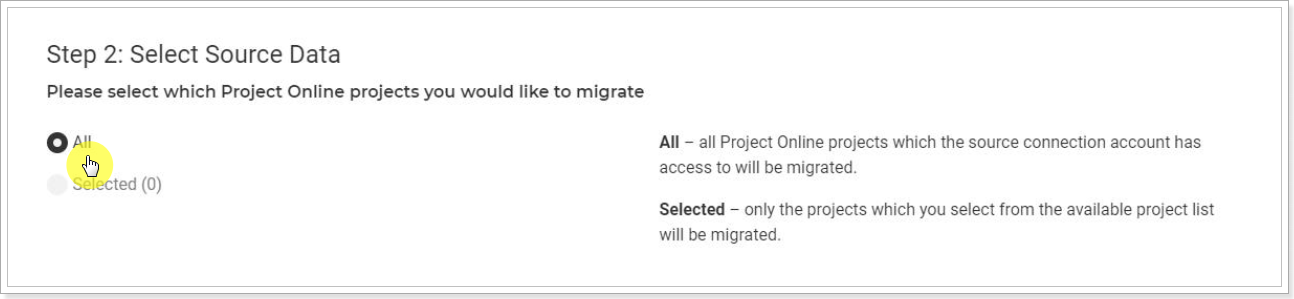
Step 2: Select Source Data
Project Migrator allows selecting all data for migration or only the required items from the list.
'All' option is selected by default. If you select the 'All' option, all projects from Project Online that the source connection account has access to will be migrated.
'Selected' option allows migrating only the projects that you select from the available project list.
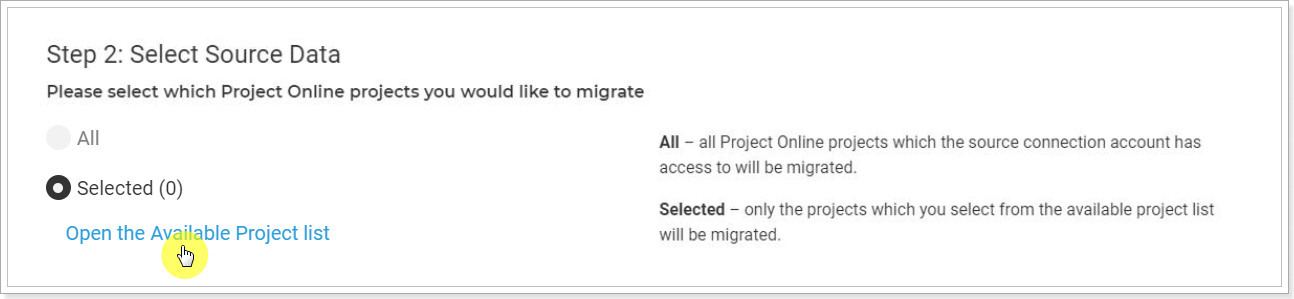
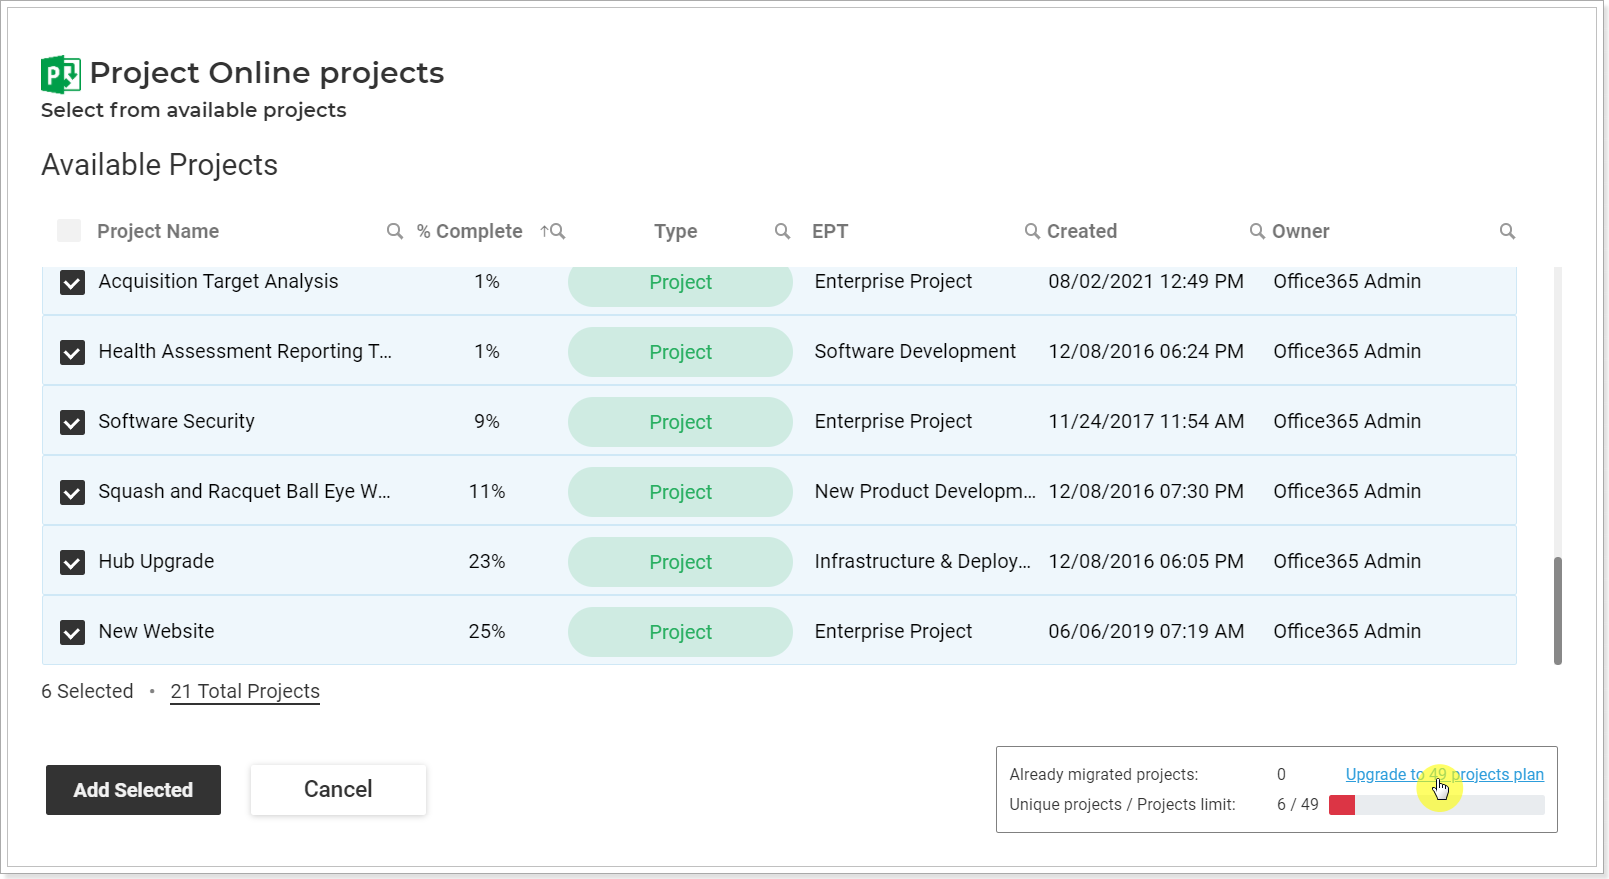
'Available Projects' window will be opened. There are several fields on this page that you can use to filter the information out and make the selection faster.
To select only specific Projects for migration, you can use the Ctrl + C/V option. For more details, please refer to this article.
Select the required projects from the list and click the Add Selected button.
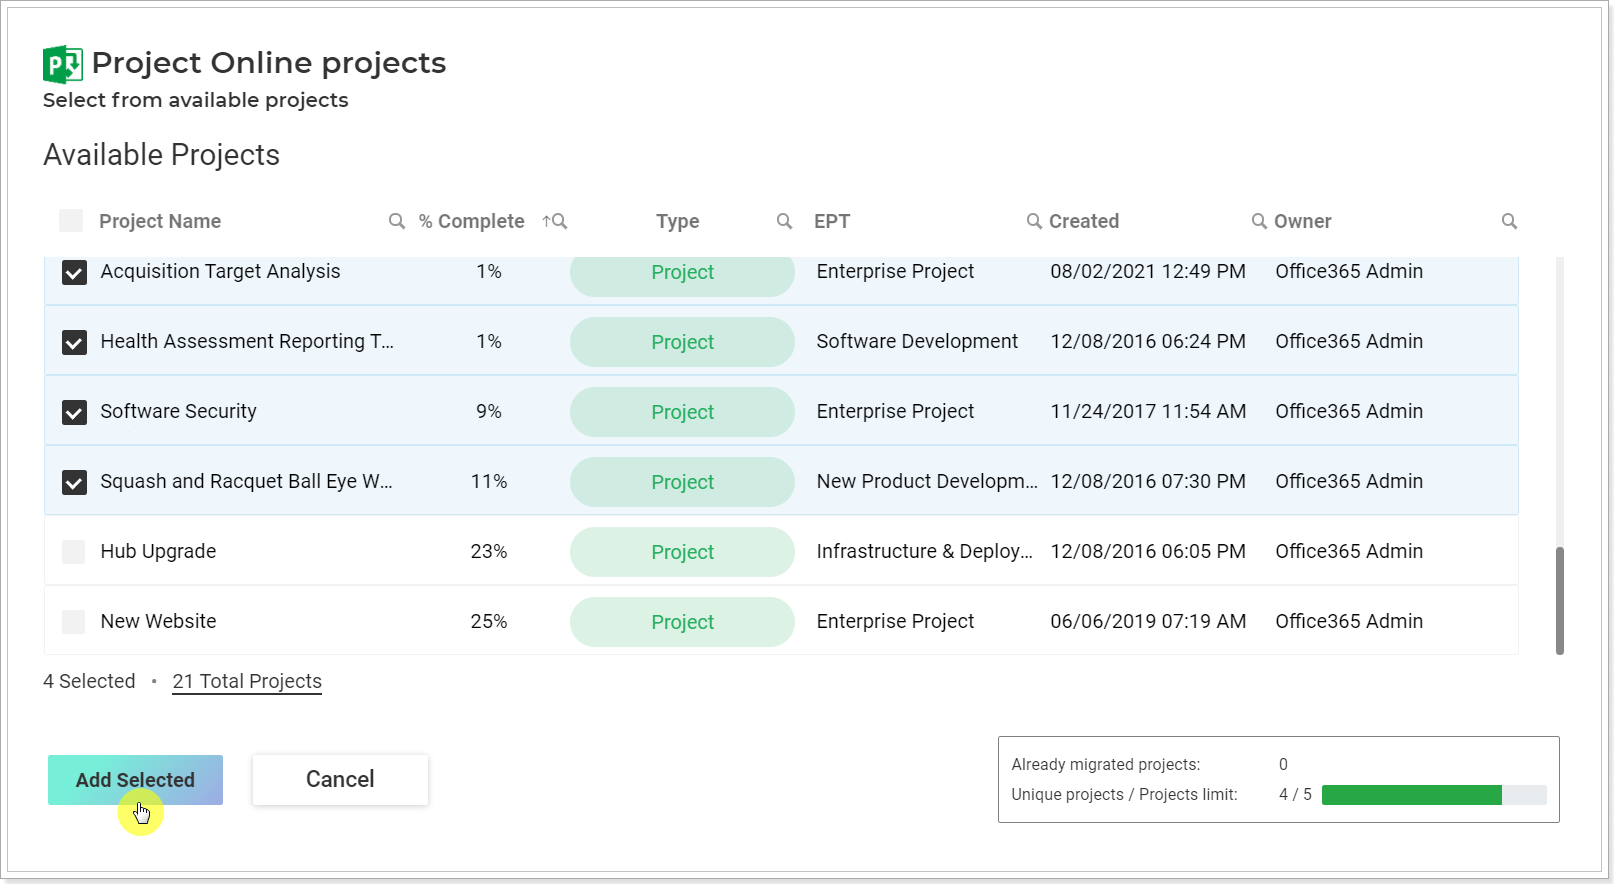
Please note: If you have not purchased any subscription plan yet, a free plan (for 2 projects) will be applied. If you have exceeded the limit of projects that you can select for migration according to your subscription plan (free or paid one), you can upgrade your plan from this page directly by clicking on the 'Upgrade to (number) of projects plan' button.
For more information, please refer to the 'Project Migrator Subscriptions' article.
When the items are selected, you can proceed to the next step: Step 3: Object Mapping.
Step 3 - Object mapping
1. Migration settings.
Microsoft 365 Group Creation Mode: In this section, you can select whether to create a separate group for each Project or create all Projects in one group (new or existing).
'Create groups using Project names': if this option is selected, each project will have a separate Microsoft 365 group created. The groups will be created with the same names as the Project names in this case.
With this group creation mode, all resources that are added to the team members in the migrated source project, regardless of their assignments, will be added as members to the target Microsoft 365 group(s) on the condition that the corresponding O365 users exist in the target tenant and are mapped with the source resources. In case a source resource is mapped with a non-user Planner Premium resource, it will not be added to the Microsoft 365 group members, but its assignments on the project tasks will be preserved.
Local project resources are not available for the resource mapping and cannot be mapped and added to the target group members, they will be migrated only as local resources in the project assignments.
The user that is a source project owner will be added to the target Microsoft 365 group Members, even if it is not added to the project team members, on condition it is mapped with the corresponding target user. The target migration account is added to the group owners and members if a new Microsoft 365 group is created. Other users are not added to the target group owners.
The Microsoft 365 group will be created with the Public privacy setting and with the default settings.
If a Group with the same name already exists in the target tenant, a new group will not be created. Project Migrator will find this group by name and will use it for migration (taking into account the setting below 'Create new or merge with existing Projects'). The settings and privacy of an existing target group will not be changed.

If the 'Create all Projects in one group' option is selected, then all Projects will be added to the same group during migration.
In the Group Name field, you can provide the name of an existing group or a new group name to create a new group during migration.
With this group creation mode, all resources that are added to the team members in all the selected source projects, regardless of their assignments, will be added as members to the target Microsoft 365 group on the condition that the corresponding O365 users exist in the target tenant and are mapped with the source resources. In case a source resource is mapped with a non-user Planner PRemium resource, it will not be added to the Microsoft 365 group members, but its assignments on the project tasks will be preserved.
All users who are owners of the selected source projects will be added to the target Microsoft 365 group Members, even if they are not added to the project team members, on condition that they are mapped with the corresponding target users.
The target migration account is added to the group owners and members if a new Microsoft 365 group is created. Other users are not added to the target group owners.
The Microsoft 365 group will be created with the Public privacy setting and with the default settings.
If a Group with the same name already exists in the target tenant, a new group will not be created. Project Migrator will find this group by name and will use it for migration (taking into account the setting below 'Create new or merge with existing Projects'). The settings and privacy of an existing target group will not be changed.
Please note: If there is an existing group with the same name and mail nickname in the target tenant, but the connection account is not a member or an owner of that group, a new group will be created with a slightly different mail nickname.
Please note: If you are migrating the Projects to an existing group (or to different groups, but there is a group in Planner Premium with the same name as the migrated Project name) the migration Planner Premium account that you have provided in the Target System section should be a member of this group in Planner Premium.

Plan creation mode: In this section, you can select how projects should be created if there are Projects in Planner Premium with the same names as Projects in the source system.
'Create new or merge with existing ones' option allows creating new Projects or merging the data to the existing Projects with the same names as the source Projects if any.
'Create new and remove existing Projects before creating' option allows creating new Projects from scratch, deleting the existing ones with the same names as the source Projects if any. In this case, existing Projects with names that match selected source Project names will be removed together with all their tasks.
If the 'Always create new Projects' option is selected, new projects will always be created on the target, even if projects with the same name already exist.

'Migrate Calendars' checkbox enables calendar migration behavior (is ON by default).

When the option is disabled: Calendars are assigned based on standard mapping logic. If a calendar from the source is mapped to the necessary calendar from the target in the Project Field Mapping, it will be applied as-is without transferring exception details from the source.
When the option is enabled, the migration follows an enhanced scenario: if a source calendar is mapped to the corresponding target calendar in the Project Field Mapping, non-working exceptions from the source calendars will be migrated to the selected target calendars. Existing exceptions on the target are not removed, only updated (exception type, name, etc.) or new ones added.
If any unmapped calendars are assigned to the projects selected for migration, they will be automatically created in the target system, assigned to the corresponding plans, and populated with their respective non-working exceptions.
Please note: Only enterprise calendars are supported (local calendars are not migrated).
Only non-working time exceptions are migrated, such as Public holidays and recurring non-working days (e.g., the first Monday of the year).
Modified working hours are not migrated (e.g., temporary schedule changes like working from 08:00 to 12:00).
In Planner Premium, all migrated exceptions are created as Time Off exceptions.
2. Project Field Mapping
In this section, it is required to perform the project field mapping for the correct migration of the values, as the field types and names may differ between the systems.
Once the connection to the source and target systems is established and projects to migrate are selected, Project Migrator maps some of the existing source and target project fields of compatible types automatically. It is also possible to map the required source and target fields manually, as required, and delete the fields that are not needed.
Please note: Auto-mapping is performed for the source project fields that have common names and types. For certain fields where the field names are different, there is a default mapping
For more details, please refer to the 'How to perform project fields mapping' article.

Users can export the current project mapping setup to an Excel file. This provides flexibility for bulk editing and reuse of mapping configurations.
When mapping is imported from an Excel file, the system synchronizes the UI configuration with the file's contents. Fields present in the file will be added if missing or updated if already configured. Fields not present in the file will be automatically removed from the UI configuration.
Empty or invalid mappings (e.g., missing source field with a defined target field) can be saved in the Excel file. However, during import, such mappings will be skipped due to type mismatches or incomplete definitions.
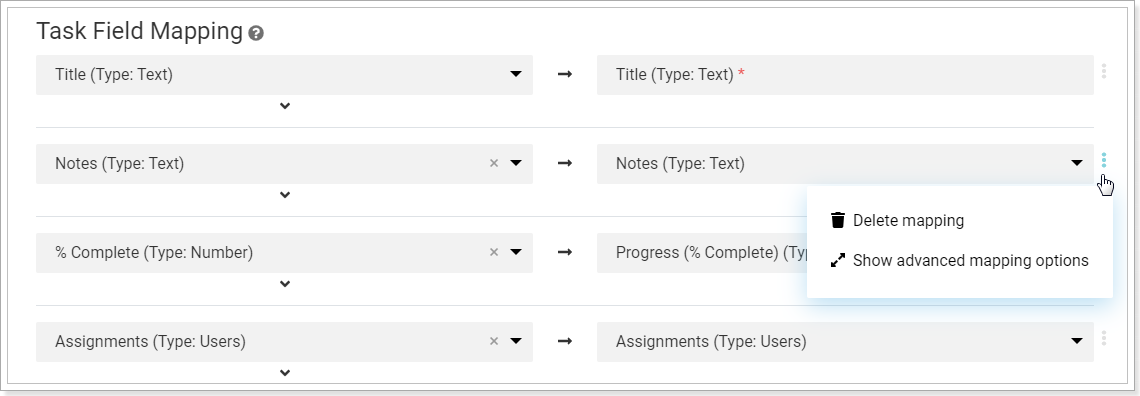
3. Task Field Mapping
This section is used to map task fields from Project Online to the target Planner Premium system.
In this section, you can review which fields are migrated from the Project Online system to the target Planner Premium system.
Default fields will be mapped automatically by name and compatible type once the connection to the source and target systems is established and items to migrate are selected. In case multiple source fields compatible with a target field are found by name, they are all added for mapping.
It is also possible to add custom fields for the mapping. All the compatible source and target fields available for mapping are listed and can be selected in the drop-down menus.

You can also check the 'Multiple' checkbox and select several fields for mapping.
If you select several source fields for mapping, you can also select the Join Values option. In this case, values from all the selected source fields will be added to the target field (the fields will be migrated and joined in the target field).
In case the Use First Found option is selected, the values from the first mapped item field found in the source will be migrated to the mapped target item field.

If a custom field that allows having multiple custom values (e.g., a field of the Dropdown type) is selected for mapping, check the Use Custom Lookup option to map particular values of the source item field with values of the target field.
If you do not need to migrate any of the field values, you can remove such fields from the mapping by clicking on the ellipsis button and selecting the 'Delete mapping' option.
Please note: You can create custom fields in Planner Premium from the mapping page. For more details, refer to the 'How to create task custom fields' article.
To use this functionality, it is required to generate a token when connecting to your Planner Premium environment.
Users can export the current task mapping setup to an Excel file (the same rules as for the project field mapping apply).
Planner Premium supports a maximum of 10 custom fields per project. When importing from Excel, if the file contains more than 10 custom fields, only the first 10 will be loaded, and any additional fields will be ignored.

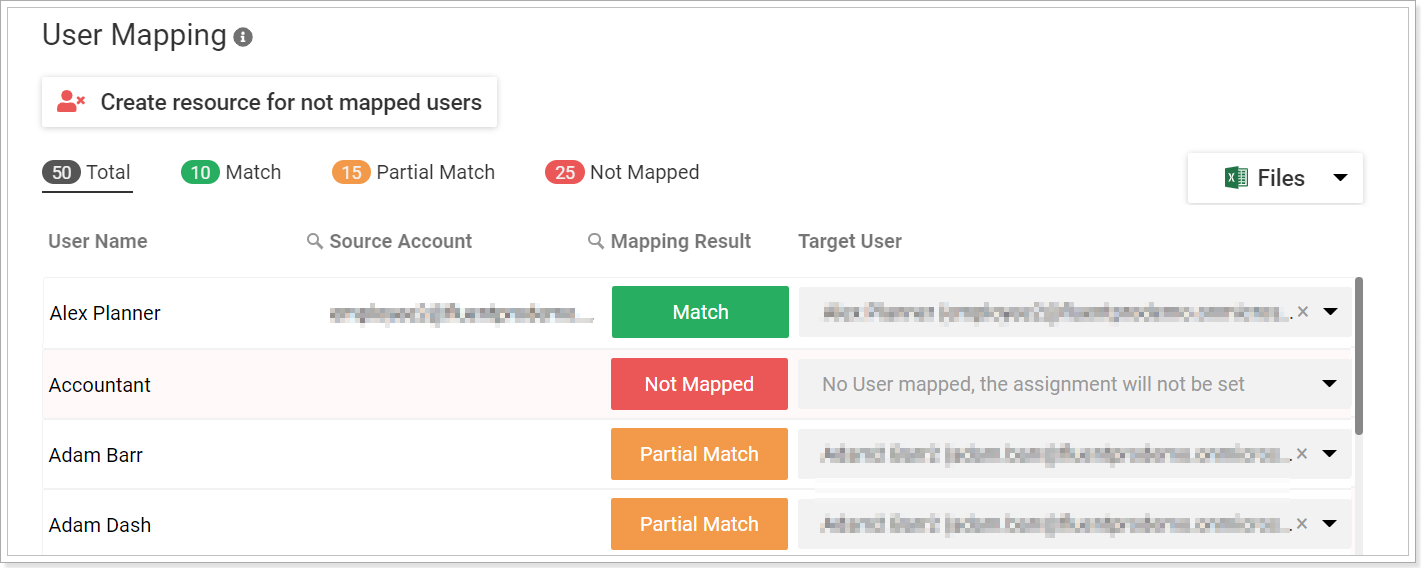
4. Users Mapping
This section is used to map the users from Project Online to the target Planner Premium system.
During migration from Project Online to Planner Premium, resources and users are retrieved from the team members of the selected projects.
This behavior applies when up to 100 projects are selected. If more than 100 projects are selected, the system will retrieve all resources from Project Online instead.
Please note: The users cannot be migrated from the source Project Online tenant to the target Planner Premium tenant. User accounts should already exist on the target environment (in the Active directory of your Planner Premium tenant) before the migration starts. In this case Project Migrator will find the required users by their accounts and will map them automatically to migrate the assignments and other resources data to the target Planner Premium environment.
If there is no corresponding account on the target system (Planner Premium), then the line with such a user will be highlighted in red and will have 'Not Mapped' status. Such users will not be taken for migration.
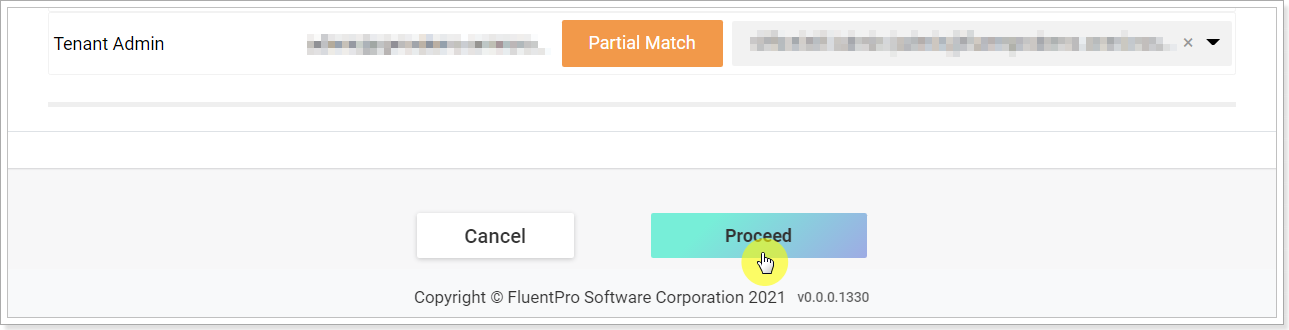
If there is incomplete correspondence for some of the users (for example, the email is the same but different user names), they will have the ‘Partial Match’ status and will be marked with a yellow color. Pay attention to such lines and correct the mapping if needed.
If there is complete correspondence found, such users will be marked with green color with the 'Match' status.
You can review the mapping summary at the top of the section.
'Create resources for not mapped users' allows creating resources in the target Planner Premium system and preserving the task assignments for users that were not mapped. However, users will not be created in the Entra ID (formerly Azure AD) on the target. In this case, a bookable resource of the Account type will be created. Since this type of resource requires an associated account, Project Migrator will also automatically create the necessary account before proceeding with the resource creation.
User Mapping can be exported to an Excel file. You can map the users in the Excel file if needed and upload the mapping from the Excel file to Project Migrator, User Mapping section.
Step 4 - Launching the migration process
When you complete all steps: set up the connection between source and target, select data for migration, perform mapping you can launch the migration process.
To launch the migration process click the Proceed button under the 'User Mapping' section.
Migration Summary window will be opened. Review the information in the Migration Information section and click the 'Start Migration' button to launch the migration process.

Please note: If you have not purchased any subscription plan yet, a free plan (for 2 projects) will be applied. If you have exceeded the limit of projects that you can select for migration according to your subscription plan (free or paid one) and did not upgrade your plan while selecting the projects, you will see the 'Proceed to Checkout' button instead of the 'Start Migration' one. You can upgrade your plan by clicking on this button and then launching the migration process.

Data Migration Summary window will display the Summary Information and the progress for the migrated groups and Projects as well as Migration Settings and Mapping.
The migrated Projects can be opened and reviewed in Planner Premium from the Migration Summary page as soon as the migration is completed.
